Color Correction and Camera Color Balance
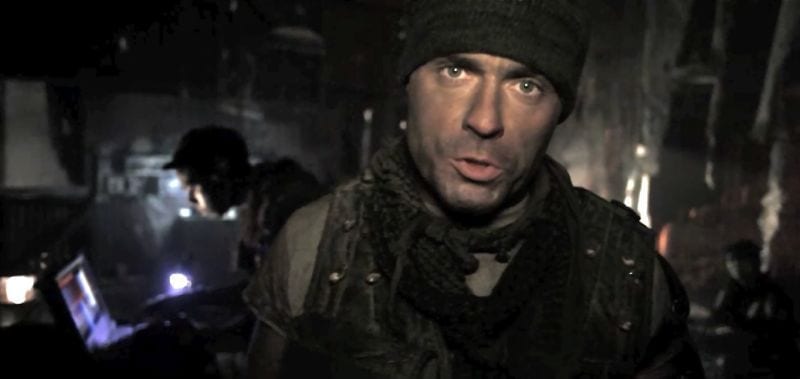
My first experience with the 5D DI color correction was for the Terminator webisodes produced by the Bandito Brothers through Wonderland Sound and Vision. McG asked me to be the Director/Cameraman for these alternative marketing shorts that were going on the internet. They would release one a week leading up to the opening date of Terminator: Salvation.
I wanted the look and feel of the webisodes to feel like a prequel to the film. So, the style and color that I had done on Terminator Salvation would be the consistent thread throughout the project.
Color Correcting Digital Footage
When we began the color correction process, we quickly realized a new grading process was necessary. The old rules no longer applied. We started with a LUT (lookup table) that gives you the look and feel of Kodak Vision print stock in the digital world and the Codec just fell apart. Andrew Huebscher, the colorist at Bandito was earning and learning as we dealt with this very compressed Codec for the first time. The old rules of color-correcting film. When Andrew would turn the knobs to make a change, the color would shift radically. We soon understood that with this fragile color space you had to move the knobs very delicately. We learned not to use the Vision LUT when color correcting digital footage.

TechCom #2 My first project on the Canon 5D and color correcting with the 8 BIT compressed color space
Canon 5D Color Correcting
I treated the 5D like I was exposing reversal film stock. You had to get it close to what your final product would be. Any extreme manipulation of color was difficult.
For example, say you were in an interior and then moved outside and forgot to change the color temperature and shot footage. Then, all your exteriors would be blue. It would be very difficult to just fix it in post. You can do it but it never matches well. It just feels wrong.

This was a shot from the Untitled Navy SEAL movie. We were color balanced for underwater which is around 7000 deg. K and when our camera surfaced it was way too warm because our daylight was around 5200 deg. K, we tried to swing it but it has a weird quality.

This is another example of our camera being set at 7000 deg. K and trying to swing the image to a more neutral tone, it is not bad, but I feel it still has a bizarre quality to it.
Our solution was to go back to the RAW Cineform 444 files and start anew. This worked very well and seemed to give us much more range. I also realized too late that this camera needs light. If you don’t feed it enough light the 8 BIT compressed color space quickly goes to 4 and then to 2.
You can always create contrast by stretching the image by pushing the whites and pulling your blacks down. Underexposure is a powerful tool with this camera, but the whole image cannot be underexposed. It will result in noise, fall apart quickly in color correction and just look muddy.
After this first experience, I knew I needed to educate myself. I read about different picture styles that gave you more digital latitude. But I wanted to create my own and each camera’s sensor is different. It is not a plug-and-play technology. I set out to tackle the EOS utility and the Picture Style editor to create my own RAW look. I took a RAW still image and then dragged that image into the Picture Style editor window.

Picture Style Editor w/tool Palette
I then moved my mouse down to the lower left corner where there is an icon that has two squares in it. You click on that and two identical photographs show up on the screen. I then move over to the right side where you find a curve graph.

The icon used for creating two identical pictures so that you can see your changes in real-time
I start at the bottom of the curve and start to bend it to open the shadows. Then, I move up to the middle and open up the mid-tones, and then finish at the top swinging the highlights so that I can suppress them to hold more detail.

Bending the curve to open up the blacks slightly to increase your dynamic range

Bending the highlights to bring them slightly down to increase your dynamic range
Design a Picture Style for each Camera’s Sensor Personality
Once this RAW file worked well in the color-grading bay, I wanted to now design a picture style that took in each camera’s sensor personality. The 5D is the king of the hill and all the others are trying to climb up to the top but they don’t even have a rope. The 7D has much more contrast, more saturation, and less detail. The 1D is a very unique sensor and is incredibly sensitive. I cannot put my fingers on it but it lacks even more detail than the 7D and has a strange contrast along with gray skin tones. It has to be a small megapixel count. So, I factor all these things into my RAW look for each camera.
Balance Camera Color
Then I went a step further. Balancing camera color is one of the most important things that you can do. Each camera comes from the factory supposedly balanced but all of them have a bias. Set up a white card with the correct color temp on the camera, which depends on the color temp of your light. If you are shooting with a Tungsten source then you would be at 3200K. If it is daylight you would be at 5200K, and so on. Or you can auto-white balance, your choice. Some cameras come with a yellow bias, a magenta bias, or a green bias. Sometimes you get one that is perfect from the factory but from my experience that is not the case.

Go To your White Balance Shift and select it
My 7Ds have come with a magenta bias and I intensely dislike that color. So dialing that color tone out was my first priority. Here is what worked for me: Go to WB/Shift+- and select it.
A graph will come up where it shows a little white dot in the center.

Here is your WB Shift Grid, here you can shift your bias
Go up to the little advance button, which is above the big wheel and it also moves your focus box. Push it one way or the other to swing your camera to produce pure white. If your camera is coming up magenta, then you would give it a few points to the green.

Say your camera has a yellow bias, I would swing it into the blue region.
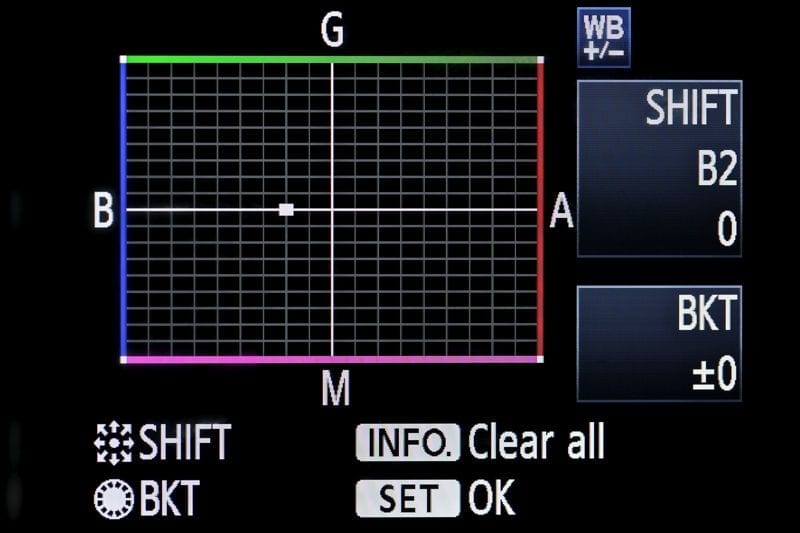
Now if the color is somewhere in the middle of what those controls can do, you can get even more specific with different shades of green, blue, etc. By going diagonally, you get a shade of red, green, and blue.

This is if your camera has a magenta yellow bias, you are making cyan by sliding up the grid diagonally

This is if your camera had a red yellow bias, you are adding magenta to counter the yellow and blue to counter the red
Balance Multiple Cameras
I take one camera that I have balanced perfectly white and it becomes my default camera. Every camera is now balanced to that. I have tried the waveform monitor thing but found that to ‘eye it’ works best for me. If this color space was not so compressed it would not even be an issue. But it is for now and this is the best way that I have found to maximize your color space.
Taking two identically calibrated monitors, I put my default camera on one and then the new camera on the other monitor and adjust to eye. Once I get them very close, I put an HDMI switcher in line and go back and forth from my default camera to the new camera on the same monitor until it is exact. I just repeat this process until all my cameras are balanced to the default camera.
It is so helpful because when you are out shooting with multiple cameras and multiple operators you need to know as a cinematographer that they are choosing the right exposures and color temperatures based on one common denominator, that every camera looks the same.
In the Act of Valor, this task was daunting. We had so many cameras coming in from so many different vendors. It is a process that is incredibly important and not many people know that this function exists. We are led to believe that it comes balanced at the factory. I can tell you this isn’t the case. Take the time and create a RAW look that you are happy with and see if your camera or cameras have a bias.
Schedule 1-on-1 Video Call with Shane Hurlbut, ASC
Looking for mentorship in the film industry? Schedule a 1-on-1 meeting with Shane Hurlbut, ASC today! This is where you can get expert advice from an industry professional on your career or a particular project.
About Filmmakers Academy Cinematographer Mentor Shane Hurlbut, ASC
Director of photography Shane Hurlbut, ASC works at the forefront of cinema. He’s a storyteller, innovator, and discerning collaborator, who brings more than three decades of experience to his art. He is a member of the American Society of Cinematographers, the International Cinematographers Guild/Local 600, and The Academy of Motion Picture Arts and Sciences.
Hurlbut frequently joins forces with great directors: McG’s Netflix Rim of the World and The Babysitter, plus Warner Bros. We Are Marshall and Terminator: Salvation; Scott Waugh’s Need for Speed and Act of Valor; and Gabriele Muccino’s There Is No Place Like Home and Fathers and Daughters. His additional film credits include Semi-Pro; The Greatest Game Ever Played; Into the Blue; Mr 3000; Drumline; 11:14, which earned Hurlbut a DVDX nomination; and The Skulls. Notably, his television credits include the first season of AMC’s Into the Badlands.



Hey Shane, fantastic stuff here, but it seems just a tad confusing. So when you’re in the picture style editor on the computer you take any raw picture (doesn’t matter what the picture is of) and you edit it accordingly. Then you can save it as a custom picture style for the camera? Also, I’m assuming that on the WB SHIFT graph when the dot is exactly in the middle that’s the factory setting. But usually it comes with a yellow, magenta, or green bias. So you adjust as mentioned above. How can you tell what bias the camera is? Do you eyeball it?
Any help to clear things up would be much appreciated. Just really curious about this.
thanks,
Mike
Shane:
Thanks for taking the time to bring this to the attention of everyone. This is the first time I have read about the “variability” of the electronics in the Canon cameras. Have you seen this “behavior” in other digital cameras you have used?
Shane, thank you very much for this great comprehensible article! Sorry I can’t read on, I have to match my 5D and 7D ;-)
Peter Hainzl, you are so welcome.
Thanks Shane,
You are the first I have seen mention this disagreeable color shift towards the Magenta. I was beginning to wonder if it was me. I did not however know about this graph style correction tool. Invaluable. Thank you very much
Clayton
Clayton, You are so welcome, it only came to me when I had 8 cameras all side by side, and that is when I started to see big color differences with them.
I don’t think I understand some of the terminology here or we are getting something mixed up. You say: “that gives you the look and feel of Kodak Vision print stock in the digital world and the Codex just fell apart.” Codex is a brand name that makes those external capture devices. Were you guys using a Codex Digital box on this shoot or do you mean “codecs?” As in the 5D compressed H264 codec?
Also, you mention “Our solution was to go back to the RAW Cineform 444 files and start anew.” I’m assuming there was a conversion to Cineform from the native Canon quicktimes? IS that Picture Style Editor in the picture a Cineform product?
Great info here it just feels like there are some steps and such missing. Thanks for posting.
Shooter Steve, In a DI color suite there are LUT’s (Look up Tables) that have been designed to give you the same color space if you were printing your image on Kodak Vision Print stock or Vision Premiere, or Fuji, etc.. This is what I was talking about, with this LUT the compressed codec could not handle it. At Bandito we use Cineform to convert all of our highly compressed H.264 files. They are like a ProRes file but much better. The Picture Style Editor is in your 5D CD set when you purchase your camera. You are welcome and thank you for your comments.
Hi Shane,
Thanks so much for this in depth explanation, it will be very usefull, even for a stills photographer like me that is discovering the ins & outs of filming.
Mario Toscani, you are so welcome. Still photographers RULE in my book.
Shane, thanks for posting this. I took a different approach when “calibrating” my 5D2 using Picture Style Editor, which produced pretty good results. I mean, all things considered. It is tricky and time consuming, but it can be done. Some people have asked me for the resulting PF2 files, but I always say that these are good only for my particular camera and that they may need to be refreshed at some point down the road. Sensors aren’t like diamonds. As a matter of fact, I’ve found that these work best for roughly the ISO rating and color temperature one created the target image with. Large deviations will also result in varying deviations in color rendition. I eventually developed one for Tungsten, one for daylight shade and another for open sky daylight.
Of course, if Canon developed a RAW solution, all of this would be a moot point.
Tico, I am waiting for the day that I can shoot 14 BIT RAW color space in 24P.
great post!
finally someone gets it straight in plain english form… this will infuse a bit more common sense into the current trend with shooting on super-ultra-mega flat picture styles we’ve seen lately. hopefully wannabee colorists pushing the limits too far on those curves will stop pretending noone noticed how their skintones often got ruined as a sideeffect.
cheers
Hi Shane,
Thanks for the handy tips. I personally have seen what you mention about cameras having different biases coming out of the factory. About 5 months ago I shot a commercial where I used 15 5D Mk 2’s on a rig. Most of them were pretty much in the same region in terms of colour cast and exposure. However I noticed that 3 out of the 15 cameras were slightly off. They had a decidedly magenta bias plus the exposure was not the same as the other bodies, even though all the settings, (picture style, aperture, shutter speed, etc) were the same and all cameras. I balanced them as closely as I could to each other in-camera and then did the rest in grading.
Eric Oh, absolutely, this is exactly what I am talking about. You do your best. You are welcome.
Wow, invaluable. Thanks!
Jerry W, you are welcome
Jerry W., You are welcome.
Hey Shane,
Does the custom white balance and wbshift hold the same biasless white when you change picture profiles? For example, if I shift my wb in my “raw” picture profile, set exposure, but then change to a really contrasty picture profile to shoot on (because I want my final image to have a very contrasty look), will the adjustments I made to wbshift in “raw” hold or will I need to create a new wbshift for the different picture profile?
-Mike
Mike, Yes the WB shift holds no matter what picture style you are in. The RAW still profile will hold also.
Actually Shane, If you have your white balance set to a higher color temperature it should make everything look warmer, not cooler – so in essence your whole example is based on a false pretext. Example: if you are set for a white balance of 7000 degrees under water and you come to the surface everything should look warmer if your actual white point is around 5200K. The bizarre shitty look you have in that shot is probably from using the ugly, shitty superflat picture style. Best of Luck. -Vincent
Vincent, thanks for the catch!! Yes the High Gamma five was shitty! Stay away from that.
Shane,
Are you sure it’s not the Zeiss lenses that gave you the magenta color balance?
Did you have the same lens on each camera when you were doing the side by side?
Charles, Yes we had the same lenses on. No it is not the Zeiss I feel.
Thanks for the in depth info! I just made the shift in my 7D and I’ll see how it comes out. You don’t find posts like this anywhere else. Keep ’em coming!
Shane. Nice article…but it’s “CODEC” (CO-mpression/DEC-ompression)
“codex” is latin for a “block of wood” ;)
Paul Schneider, sorry typo, I like the block of wood too.
I now use the custom white balance function when shooting video. The presets and color temperature settings work well enough for me when I’m shooting stills in RAW and have the option to change white balance later. However, that 8 bit codec on the 5D doesn’t allow sufficient latitude to shift white balance much. It’s very sensitive in my experience. Feels like you really have to get it exactly right in camera.
S. Allman, that is exactly right, treat it like reversal film stock and you will have huge success.
Wow!
Thank you so much, I always hated how Canon pushed towards pinkish-orange flavor. You can definitely see it in the latest video from the Zacuto shootout, where they compare DSLRS against film. I’m so glad there is more color tweaking we can do besides white balance!
Thanks,
Great as always, this is the best site concerning 5D videos. Thanks a lot.
Egon, thank you so much for your kind words , that made my day and I had a tough one.
hey Shane is it possible that you could post your raw picture profile?
so we can try it out on our 5d’s. i really don’t trust my sloppy hand on the picture profile editor.
thanks
Andrew McMillian, I will think about it. It is something that has taken me some time to perfect. In the mean time experiment. That is what I did. I made so many mistakes with trying to extend the latitude, but what a great learning experience it was and seeing how far you can push it.
Hi Shane,
Very useful insight into picture profiles.
Apart from the curves did you find any benefit in playing with the saturation and contrast dials or did you leave them as their defaults to keep the look in camera closer to the final product?
We have so far stayed clear of the superflat profiles as we didnt see much point in taking contrast and saturation away only to put them back later on and often with bad results.
Also, what profile do you use for your base? The results do look tremendous
Thanks.
Danny, stay away from the super flat picture styles. Yes I love the neutral setting with -4 contrast and -2 saturation with Canon glass, and -1 saturation with Zeiss. Thank you so much.
Great info, this is super helpful Shane! I did have a few questions though…. Did you use a special type of white card or 18% gray card? Also, do you need to know the color temp of your light source or does that not matter?
Scott Gold, I just used a piece of white foamcore. Yes, you do have to meter the color temp. of your light. That way you are as spot on as possible.
Shane, thanks for your continued sharing so we can learn from your experience. I’ve heard your interview on the red centre podcast and you are a passionate DP and interview well.
I had a question about your redrock “man-cam” that is in the top of your website. Which one is it?
Is it the Ultraport:
Or is it the Stubling:
The photo off the Redrock site is doesn’t show the off set grip configuration that you have yours at.
Thanks, and keep up the great work!
Darren, first of I am glad you enjoyed the podcast and secondly thank you for your kind words and comments. The man cam set-up that I use is a Hurlbut Visuals version of the Capt. Stubling. I offset my handles and have manufactured my own HV baseplate.
“Actually Shane, If you have your white balance set to a higher color temperature it should make everything look warmer, not cooler – so in essence your whole example is based on a false pretext. Example: if you are set for a white balance of 7000 degrees under water and you come to the surface everything should look warmer if your actual white point is around 5200K.”
Vincent, if you re-read the article, that is what is said. Maybe you were in a rush today hehe?
K Wasley, Vincent was right, I was up very late after work and flipped the warm and the cool. Sorry about that. It has been so crazy and I love how involved and supportive all of you have been. Thank you so much for your comments. But it doesn’t make my example a false pretext, whether it is warm or cool and how you have to swing the image, the CODEC will not hold up.
Great stuff Shane, I noticed from one of the sceenshots that you’re using the AdobeRGB colourspace, is this a better bet than sRGB? What are the differnces?
Cheers.
This is brilliant timing. I was struggling with just this issue the other week with my 7d being more yellow than my 5D2. Now I can get them set up to match perfectly.
If you can only help us on how to sharpen up the 7D a little to match the 5D2 better, that would be perfect.
…I’ll leave that one with you…
Many thanks
Avey
Wayne Avanson, I am glad that I could help you with this process, on the sharpening front I would do all that in the post process and not with the camera. The 7D will be slightly softer than the 5D because of the megapixel count and the size of the pixels. The 7D has a totally different contrast ratio because of that also.
Or maybe the, ahem, technical malfunction was corrected. ;)
What do you mean by “RAW Cineform 444 files” ???
I only know of the in camera H.264 codec and either ProRes LT or HQ after converting the H.264…
Alex Chinnici, Cineform is the premiere file that opens up the compressed H.264 codec. It is far superior to ProRes. I am doing a post production blog following this color correction one that will take you through how we posted the Navy SEAL movie “Act of Valor” and our workflow.
Thanks Shane! Big fan :) I look forward to the post
Tough day, huh Shane? Tell it to my D-tap cable!! ha ha.
BTW, been getting very different results than you with the 1D–skin tones generally anything but gray. Pink caucasian skin is actually going the other way, oversaturating in the red channel, but olive and darker skin tones are looking great. This would have been a good camera to shoot Bernie Mac back in the day!
Charles Papert, why is it a tough day? Once you suck the magenta out they look grey because of all that over-saturating. I would try AdobeRGB color space, it will mute the colors slightly, especially pink. Bernie Mac would have loved that camera. Your D-Tap power cable went with the monitor. Probably after my baseplate went to your fabricator.
just love all this stuff!! greetings from australia
you are the only person blogging this in depth technical stuff and though I find it hard to get a grip on it is a wonderful resource to return to as my knowledge grows…..please keep it up…everybody loves passion! cheers rod Hardinge
rod Hardinge, this is how I try to set myself apart from all the other HDSLR noise out there. You get intimate, personal blogs that I share with all of you from work experience in the field. You get me answering every comment personally. It is from my heart, I want to educate and inspire.
Shane, Thanks for all the great information. Just wanted to know if you always keep the sharpening all the way down in the neutral setting? Also, have you found that you need to sharpen the image in post, depending on the look that you’re after?
ilia djondric, I never use the sharpening tool. I will sharpen in the post color correction process if need be, it is much cleaner.
Just wanted to say a big thank you for all the effort you put in to this very informative blog. Keep up the good work!
Jeff Wood, you are so welcome and I will.
Shane…great info…very interested in your comment regarding Cineform outperforming Apples Pro res…looking forward to your next chapter about this subject.
Best Regards
Ken Glassing
ken glassing, you are so welcome. Post workflow coming soon.
Shane,
As always, extremely valuable and in depth information. As I’m still learning with the camera, workflow, etc, I’m bookmarking and archiving these posts… as I’m sure they’ll prove their worth down the road. I love the “in over my head” feeling though…
I do have to say, I think my favorite quote of yours, from the shoot a few weeks back, was “What IS this sensor?!?!” Made me smile. :)
Cheers sir & thanks so much for doing what you do!
– Brandon
Brandon Cummins, You are so welcome.
Gosh I will never understand how you guys have such incredible knowledge of colors. My girlfriend is a painter and she’s the same way. She can distinguish the slightest difference in color shades, amazes me. I guess I just have to keep training these little ol’ eyes of mine. Very informative post as always Mr. Hurlbut.
Cheers!
Roman France, thank you so much for your support.
Shane, this is fantastic information- thank you so much.
This is also a but off topic, but I was wondering if you have ever experienced horizontal banding when shooting under commercial fluorescents and LED light sources? I did some night car rigs a few weeks ago with a 7D, lit with EL panels (flexible electroluminescent sheets like those used in “Collateral”) and we got travelling horizontal lines both on the screen and in the shot footage. I have experienced this same problem shooting under practical fluorescents that probably had old ballasts, and have never been able to dial it out with the shutter speed. Is there a solution to this aside from relighting or rewiring from scratch? If you’ve experienced this, does it show up on the 5D / 1D as well?
Matt I, You are so welcome, yes I have experienced this, those EL panels are not cool with the rolling shutter. Did you go down to 1/30 of a sec. Yes it shows up on all cameras.
thanks shane for sharing knowledge on the subject of color. I have one off topic statement to make and wonder if it bugs you too. I noticed that canon achieves 16:1 by adding these black bars across the video image. During preview it’s grey and the lost part can be seen there. Can you please with all you influence on canon ask them to remove this, or give us the option? This would be really nice (I think) for all those folks shooting on anamorphic lens. especially if it’s X2 squeeze.
Charles lim, you are so welcome, I will do my best.
Shane,
First off thank you for your wonderful blog. As a fellow cinematographer who shoots with both Red and the 7D (soon to purchase the 5D), I find this information to be invaluable.
Now I’d like to ask, do you have any white card shots before white balance shift and after? I’d love to see just how much of a bias there actually is.
With the 7D, if I know the footage will be color corrected I shoot it on the superflat custom preset. How much of an effect would say a magenta bias have on an image shot with the superflat preset?
Also off-topic but please do a blog in the future about aspect ratios and the Mark DSLR series! I’d love to see how you set up each camera for 1.85:1 or 2.35:1.
Dorian, I can get you a white card still frame. I am not a big fan of the superflat Picture Style. I find that if you have the time to dick around with monitors and LUT’s on your shoots than it is fine. I am trying to create a workflow that is very much like exposing film. I use a picture style that gives me some latitude but not so flat that I cannot judge the exposure on the back LCD screen when shooting day ext. I found with the superflat Picture Style I under-exposed all of my shots.
On the aspect ratio I use a quick solution. Take your focus box and push it all the way down to the bottom of your screen, the top of the focus box will be your bottom frame line. Push the box up to the top of your screen and the bottom of the focus box will be the top frame line of 2:35. Then I use thin white tape to make the frame lines. 1:85 is the width of my white tape down from the 16:9 grey lines that are on the LCD screen. Magic lantern has a firmware that gives you frame lines and different aspect ratios. You can download it online.
Shane, this is awesome! I had a question about the above w/b shift suggestions. Were those for the 7D only? I have the 5D and haven’t really played with the custom settings, should I?
Josh Negrin, This is for all of the Canon DSLR’s 5D, 7D, 1D. Try it out, you can always set it back to the center. See how the WB comes up if it looks white then you are good. If not, try to adjust.
Hey Shane,
Thanks for sharing such insightful info for aspiring filmmakers like myself. You’re guiding us to get the most out of our cameras, and I really appreciate it.
Aaron Goatley, You are so welcome and thank you for your continued support and trail blazing spirit. We can change the way cinema is done. I know out of this disruptive technology will be a wave, like Film Noir or French New Wave. We need to come up with a name for this style of filmmaking.
Shane,
This is great information and very educational. Thank you. I know many people, including myself have sought after this kind of online documentation.
In regards to determining what my 5D is biased towards. Is there a simple technique involved to determine the bias? Should something like a Color Accu-Chart be used? Or is there a cheaper way (I saw mention of a white card above but wasn’t sure what that entailed)?
Thanks again for sharing your experience! I look forward to more posts.
JCahoon, I simple piece of white foam core will do. I shoot a white card under a light that I use my color temp meter to gauge. If it reads 3200 deg. K then I place that on the camera and roll video. I then look at the white card back and see if it has a bias to eye. My 1D’s come up yellow and my 7D’s come up magenta. My 5D’s are a mixed bag. Then I go in and adjust the WB Shift/BKT in the way that I think it will swing the image more white. Then I roll some more video and look at it again. There are some Black Magic vector scope plug ins that you can pull up to help you get it close but I have done it to eye at this point, getting it close, that is the main objective. You are welcome and thank you for your support and awesome comments.
Shane,
I remember reading (somewhere, I can’t recall) that there was some sort of co-relation between the Canon’s WB Shift/BKT adjustment and the series of Wratten Colour Compensating gelatin filters.
Do you know anything about this?
Thanks for all the info.
Matt b, no I have not heard anything about that. Seems different. I will look into. You are welcome.
Shane,
I finally found the reference I referred to, and embarrassingly for me it had nothing to do with CC filters, but mired values.
Each unit of Shift on the Blue -Amber axis represents 5 mireds of colour temp correction.
For example if you set a base 3200K WB (313 mireds) and were shooting a scene lit by a 100w incandescent practical you could compensate with a B6 (-30 mired ) shift . This is close to a traditional #82B cine filter.(-32 mireds).
……or you could just let the scene alone!
Thank you friend. This is the most important information I’ve read since researching this technology.
jw, you are so welcome.
Glad to see the 5D is getting a work out in your workflow. But, curious what you mean by “our solution was to go back to the RAW Cineform 444 files”. I thought the HDMI output from the 5D was unusable because it was scaled down and not full HD. How do you get RAW 444 files from a Canon 5D? I shoot with the 5D, and find some of the compression artifacts can be a bit distracting, especially after running them though post (which I try to keep at a minimum).
Best
Jeff
Jeff Steinmetz, we are not getting RAW 4:4:4 out of the camera, it is what we are calling RAW 4:4:4 cineform files. These are like putting it through ProRes which uncompresses the highly compressed h.264.mov file. You can ProRes at 4:4:4 into a Mac or cineform which a PC based decompressor at 4:4:4 also.
Ah, that makes sense. For a second I was like “wahhht???”. I use ProRes on the mac. Just making sure I didn’t miss something.
Now I am hearing something about “TRUE ISO” values. Or ISO values that don’t have a second level of processing in the camera. Is this something to be concerned about, or is it a Myth. If not a myth, is there a chart of 5D true ISO values (like 160, 600, etc.). And how do you get to 160? (200 – 1/3).
Jeff Steinmetz, if you sign up on my website to the Inside Track, you get a newsletter each month that gives you more insider trading info. There are archived newsletters that have the Native ISO charts and the noise. Check it out.
hi,
i have read on your newsletters that you suggest to use color meter like the old minolta color meter.
As you know this is expecially for film camera.digital camera sensor have different approch to RGB.
do you have suggestion how to use and interpret minolta color meter with this camera?
or do you have other approach to control and setting in the best way the color temperature?
thanks
ivan, does not matter at all. It is still gauging what the color temp of the light, whether it be daylight or tungsten. RGB aside. I have gone with the shortcut recently with the WB button on the top of the camera and scrolling the wheel to get my desired look.
I have been looking through similar blog posts in this topic. Not many of them are good with writing skill and quality, but yours is an exception. I would like to read more of your writings on this subject.
I have been looking through similar blog posts in this topic. Not many of them are good with writing skill and quality, but yours is an exception. I would like to read more of your writings on this subject.
I have been looking through similar blog posts in this topic. Not many of them are good with writing skill and quality, but yours is an exception. I would like to read more of your writings on this subject.
Shane, thanks always for you and your teams’ leadership in the field and exhaustive research. We really appreciate it, and especially appreciate the time you take to respond personally to questions and posts–just as inspiring as the imagery, thanks so much.
I have a tedious, technical question that might be better posed to Mike–or maybe someone else on the team, since he’s mostly a PC editor…Topic: confronting the issue of Gamma Shift with DSLR footage. The FreshDV guys have links to a couple of blogs who are taking a stab at it, but I figure the HV Team surely has some kind of solution that could be instructive to indies…
Do you guys find the Cineform codec the way to go for consistency’s sake in color grading?
What about offline vs. online editing–have you ever considered cutting in one codec, and correcting in a higher grade one?
What about how you compress (when you are going for the web, or even for broadcast): how do you ensure that your hard work grading isn’t compromised by the compression?
Like most people, I’m working in FCP 7; I’ve got a Mac LED monitor, and for color correction, an HP Dreamcolor Monitor (the HV lighting monitor), run through a matrox I/O from my Mac Pro Tower to judge color. What would you guys recommend for your average indie filmmaker like myself? I want to perfect my skills with color grading DSLR footage, but I’m unsure about how to proceed with a workflow that both protects my colors and is sustainable, both in terms of time and economics?
I don’t expect you to answer this immediately in a post, but it would make for a fantastic HV Guest Blog report.
For further reference, please see: http://www.freshdv.com/2010/06/cc-gamma-issues-dslr.html, which links to http://motionlifemediablog.wordpress.com/2010/06/02/which-version-do-i-color-correct/, which links to http://nofilmschool.com/2010/06/color-correcting-dslr-footage-on-a-mac-is-a-clustercuss/
My gut says stick with ProRes LT and FCP, maybe export with x264 instead of compressor to preserve gamma characteristics. The perfectionist in me says get Cineform, work offline in low quality prores, then grade color in Cineform–but this seems asinine. Help!
Thanks again, all the best, Joe
Joe B., thank you so much for your kind words. I would email Mike McCarthy my guest blogger on all this post stuff. He is the best.
Shane,
My friend Mark Pellington recently shot an Alpha Rev video on a 5D and 7D. It’s a black and white video and if I heard him correctly you advised him to shoot the video monochrome in camera.
1. Is it better to shoot in monochrome in camera than to delete the color information later? This seems closer to your assessment that this makes your raw content closer to the working space you want in the end anyway.
2. Is the monochrome present good to work with, the one that the camera comes with or would you still create one in the EOS utility?
3. Is it good to reduce the contrast & sharpness if shooting this way as well?
Cheers,
Rod
Rod Blackhurst, Yes that is what I advised them to do. I did test and found that we had more range in the monochrome setting, mainly in the noise department. So what I do is put it on Monochrome and then adjust my contrast accordingly. Always send your sharpness to -0 and dial your contrast to the range that feels good to you.
Hi Shane,
I tried your method of shifting the WB to green to counter the magenta colour cast on my Canon XSi but I wasn’t really satisfied. Either my skintones and browns were still too magenta, or I’d get a green color cast over the shots. I got better results by leaving WB shift at 0,0 and adjusting the color tone in the picture styles to at least +2.
Unfortunately one of the side effects is that the red colours shift to orange. Therefore with color tone +2 I used the Picture Style editor to select red colour and dial a Hue adjustment of -10 (and when using color tone +4 I adjust Hue -20, suitable for asian skin tones).
My 2 edited picture styles are available at
http://www.mediafire.com/file/2meyj2mgg4w/Faithful +2 Red Adjust.pf2
http://www.mediafire.com/file/mlhtfnuw3hj/Faithful +4 Red Adjust.pf2
if you’re interested.
Phil C, I could not open the files to view, I would love to help you with this. I have tried the color tone and not happy with that also. I did go into the picture style and take the magenta out also. Do you like that way. The WB shift is good for simple corrections, not big swings. But that is usually all that is required to balance the camera, maybe you should send that baby back to Canon. I have sent back 4 of my 7D’s. I cannot get them to look right.
hi,
do you have tested this gamma curves?
http://lightillusion.com/canoncurves.htm
ivan marasco, yes, they are not happening. I have found that you really need to keep with the general camera settings. I feel that I get some decent latitude out of my cocktail that I have created. When you try to bend the curves in the highlights to suppress them the image gets mushy and it is hard to judge your exposure. You can try shooting with this but you would need to constantly judge your exposure with another picture style that is what you want the final project to look like and then switch back to the flat look and hit record.
Hi Shane, I’m pretty sure my camera doesn’t have a WB issue. My white colors do come out white. It’s only the way my camera renders yellows, browns and olive skin tones with a slight skew to magenta tone at Color Tone 0 that dissatisfies me. A good test is to shoot a yellow street sign during the day and check if it comes out yellow. If it comes out orange, there’s probably too much magenta which can be corrected by increasing the color tone. I can’t speak for the 7D but I’m pretty sure that all Canon XSIs behave this way. A friend of mine who’s a regular on photography forums refers to the Magenta as “Canon Color.”
Using Color Tone +4 with the Faithful Picture style corrects the magenta tone for me. Faces look more natural, grass is greener and browns are browner. I have a version 2 of my picture style which uses a better red color base for correcting red tones. This version is more likely to render red cars properly red. Open a RAW image in DPP and in the RAW tab click Browse to load the picture style.
http://www.mediafire.com/file/nz53dzvm1jg/Faithful +4 Red Adjust2.pf2
Just be mindful that there may be a sharp tone change for anything that is Orange-Red.
We have developed a picture style for both the 5D and 7D that is featuring this kind of color correction and flattening, build into the style. The picture style was originally developed to match the Panavision Genesis camera with the 5D, and the colorimetric adjustments in the picture style are devised not only to match the Genesis, but to get the best representation of the macbeth color card used. It’s free and available from:
http://marvelsfilm.wordpress.com/2010/11/21/new-marvels-cine-picture-style-for-canon/
Cheers!
Martin
Martin Beek, thank you so much for posting this and helping all of our co-collaborators out. I am going to try this baby too.
You should check your rss newsfeed, I cant sign up for
Koolitusveeb, I am having my Elite Tech team look at it, so sorry about the inconvenience.
Hi Shane, I appreciate all of the great info you share. I had the pleasure of using your Hurlbut Visuals indie rental kits (you were so generous to donate) as the primary operator on the Paddle2live.org cancer fundraiser last September/October. I loved the settings that your 7d and 5d’s had. Are the settings from this page similar to what I was working with? Also, I shot most of the stuff with the 70-200 at 200 on the 7d handheld (I was on a skiff) and even without the gyro in rough seas it seemed I had less wobble issues than I’ve had on my own 7d. Any explanation of this?
thanks again!
Jeff
Jeff Wright, It is the settings that I turn off in the camera that make it shine. Make sure the auto light optimizer in your camera is Disabled. Make sure that your Peripheral Illumination correct is Disabled. Highlight Tone Priority Disabled. High ISO noise reduction Disabled. The other thing is the shoulder mount and the weight. It keeps it stable and less of the vibration that add to the wobble and rolling shutter issues.
Thanks Shane!
Mr. Hurlbut,
First, your sharing of experience and knowledge is very much appreciated.
Since I don’t have access to a high end color correction platform- speedgrade or DaVinci- what would be your recommendation for color correction software which would be accessible- currently I have access to cs5 suite with colorista- apple color, avid media composer?
and besides your secret picture styles:)- is it possible to get the look one would want in camera only that would stand up to the big screen?
Thank you in advance for your time.
Hoon
Hoon, Thank you so much for your kind words and support. On the Marines commercial I did hardly any color correction other than a little added saturation and contrast. I did that all in CS5. Neutral Picture Style. Yes it is totally possible to get your look in camera, you have to for it to hold up on the big screen.
Thank you.- needles to say it’s awesome/priceless to have someone of your caliber to answer everyone’s questions directly.
I look forward to all the new innovations and the learning-also watching your future endeavors.
any advice where I may acquire any used gear for a far less than impressive budget- guess finding a legitimate source is the trick
since I am not a “enrolled” student – official student programs are not an option
Hi Shane
Your work and website a true inspiration. Recently bought a copy of DSLR Cinema and enjoying the case study chapters, especially making of Last 3 Minutes. I own the 7D and am trying to apply all the information I’ve read so far.
Please advise if I am on the right path on the following.
If I understand correctly, you advise to set up custom Picture styles for different lighting(color temperature) conditions, ie Daylight Shade, and Tungsten, and also duplicate ‘flattened’ versions of these same picture styles that you roll with when you start shooting. Am I correct?
One recommendation that I don’t understand is for setting ‘ Highlight Tone Priority Disabled’
My understanding is that helps preserve highlight detail in camera by underexposing the highlites a full stop and pushing the shadows, midtones up. Shouldn’t this always be turned on(except for night shooting)?
Thanks and regards.
Shane, the information you provide is amazing. I’ve located you through multiple Google searches now on unrelated topics. But I have an issue: the Canon T2i doesn’t have a Kelvin control. I’m getting a white balance lens cap to compensate, but I haven’t seen you write anything about said accessory. Is it because you prefer full control, or because it’s necessary to sync. multiple cameras? Would you recommend an accessory like this with what I’ve got?
Mark S., Thank you so much for your kind words and support, I have never used that or heard about it. If this makes your Canon T2i look amazing then go for it.
hi shane,
do you have tested technicolor cine style and what you think about?
ivan, check out the latest blog. Thanks
When you say you went back to 444 RAW cineform. What do you mean exactly? What are you doing to avoid the H.264? Sorry, I’m a novice!
Hello Andrew, check this out for great results:
Regards and success.
Anybody know how to color correct footage shot in daylight with the white balance set to tungsten ie blue cast?
With stills this is quite correctable but not sure how this would work with 5D footage.
thanks
There seem to be so many recommendations on picturestyles but none on how to then work with em. After shooting with a “flat” setting, getting a big dynamic range I have problems finding tutorials on how to get the best out of that material in postproduction. Any suggestions on good settings and workflow in Final Cut Pro? As soon as I start to tweak the saturation and blacks, the exported movie really lacks the quality from the original shots… And I haven’t even dared to touch Unsharp Mask.
I’m curious about even though Adobe Premiere CS5 can edit H.264 files, is it still worth uncompressing them to 4:4:4
Shane-
We spoke a few months ago as I was prepping a 5d/7d feature and your input was invaluable, so let me just say thanks for sharing your time and expertise. We have now locked picture and are getting ready to do our final color timing and I am most concerned with projection in a theater environment. This is a low budget project and we may not have the resources to go to one of the premiere houses for color timing-do you have any advice or wisdom to offer in terms of approaches and/or houses that do a good job with DSLR footage translating to projection on the big screen?
Thanks very much
Darren Genet
darren genet, I would call Bandito Bros. They have there own Davinci Resolve and 12 ‘ screen color bay with a 2K Christi projector. I think they will be the perfect place for you. Call Jacob Rosenberg at 310-559-5404. Tell him I sent you.
thanks very much for the reply. Our producer is swinging us to i/o films and I have insisted that we at least project the film on a big screen to check our coloring in terms of noise and contrast. We are pretty low budget on this one and I’m hoping that the work we did in prep and testing will prevent any issues in final color correction. If we do run into any noise issues, what fixes would you suggest?
thanks
darren genet, Cinnafilm, check out my blog about this process. It will make your 5D footage shine. Bandito Bros bought the Dark Energy tower so they can manage your compression noise as well. They will work with your budget. Great people.
A little late to the game here as I’ve recently switched to Canon from the GH2. The flat picture profiles really do make a difference, the Panasonic has such a baked in contrast that is hard to grade. I love your advice of treating 5D like reversal stock — this concept gets lost so frequently these days.
I have the same question as Nish above – using Premiere does it make sense to work with the H.264 files or to use a decompressor. What solution would you recommend for decompressing if so?
Shane, thanks so much for all the information you share. You’re a gentleman and scholar.
J. Nathan Evans, thank you so much for those wonderful words of support. I would have to pass that to Vashi to answer.
I am interested in the same. Vashi if you could answer, I would be grateful! I am just starting to mess around with the 5DMk3 and Adobe CS5.5 using the CineStyle setting. Of course, I just downloaded CS6 Master Collection and cannot wait to start playing around with Speed Grade (and the ability to bring in LUTs), but I am wondering about workflow. Should I use Adobe Prelude to transcode the footage… will that give me more latitude? If so, what should I be trascoding to on the Mac?
Thanks for all the information!!
Hi Robert! Just saw this and wanted to get back to you. I would not transcode your 5D footage. Bring it right into Premiere and edit natively…you will get the most latitude and access to the information inside Premiere as it handles the footage in floating 32 point. Canon and Adobe worked out some very special secret recipes to make Premiere and h.264 footage work at the highest level. No transcode! Just import and edit away! I hope that helps…
Hey I just shot a shortmovie with a rented 5DMKII and going to buy the 6D for shooting my next one, but I have to say that I’m not even a student so I’m don’t have a lot of technical knowledge. Here are two questions I’ve got:
1. I just read that you’d recommend to Premiere users to edit the native footage. Means that I shouldn’t even think about decompressing and transcoding to RAW Cineform 444 files (as I read further above)?
2. “CineStyle” setting means I follow your discription above and create my own Picture Style, or can I download one somewhere?
Thank you so much for your help!
Tim. Thanks for the comment and support.
1. Adobe Premiere CS6 can ingest DSLR footage natively without the need to transcode. Just import the footage and you can start cutting right away.
2. Cinestyle is a picture style you can download from technicolor to load onto your DSLR.
thanks shane for this informative post on color. I have one off topic statement to make.Keep it up sharing.
paul @ wedding videography, you got it
Thanks for this! I’ve been saying for months (to myself,mostly) that LUTs just don’t work the same on h264 footage. You apply a LUT and it goes all to hell; color cast, saturation… I’ve been better off just hand tweaking my footage without any kind of LUT. This article will help me big time. Thanks again!