Post-Production: A Direct Network Storage Solution for Editing & Color Grading (Part 1)

We used the G-Speed Studio XL for an effective post-production network.
In our article, Foundations for Workflow, File Management and Post-Production, we reviewed why having a solution foundation and base to work with is so incredibly important and crucial to your future growth in post-production. We discussed how we built our Hurlbut Visuals post workflow and we are excited to take you through the process. We’re going to break this up into two parts. It is important to note that if you are looking to build a system similar to ours or design one entirely different, you need to take the time and invest in the right materials to avoid making costly mistakes.
What is a Direct Network or Network Attached Direct Storage?
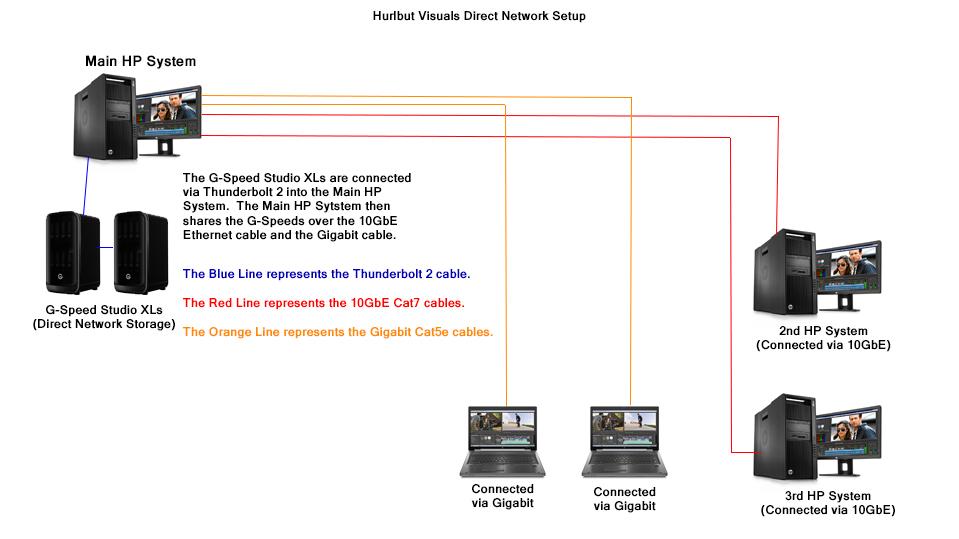
This type of system allows you to take a physical drive, like a G-Speed Studio XL (in our case at Hurlbut Visuals) or even a USB 3.0 G-RAID, and connect it to your computer and share it over the computer’s network. That’s the basic idea. You’re plugging in a hard drive to one computer, connecting that computer to either a 10GbE connection or a Gigabit connection and then other computers are connected on the other end via either a direct connection or a network switch.
Here is a visual guide of our workflow setup with our Direct Network:
Why Direct Network? What is Shared Storage, and what are the advantages?
First, if you’re working in an environment where you have multiple people who need access to digital material (video, photos, graphics, etc.), you may want to consider shared storage. It would be especially beneficial if you are currently set up with multiple 4TB, 2TB and 500GB little hard drives that you constantly pass around the office.
Shared storage is pretty straightforward. Let’s use Hurlbut Visuals as an example. We have five people who constantly need access to all of these materials – Shane, Cooper, Dylan, Megan and me. Oftentimes, we need access to the same file. So what are the options?
Shared Storage Options
- Create multiple duplicate drives so that we can all access the same file, but on different drives
- Shared storage so that we access the same file, all from the same location.
The multiple drive route creates chaos. Remember my workflow article? This comes into play here. If Dylan changes the name on his file or updates an Adobe or DaVinci project file, but it only stays on HIS drive, that does not update MY drive, or Cooper’s or Megan’s or Shane’s. Multiply this by countless projects and files and it becomes a mess.
If we go with the second option, each time Dylan updates a file, we all see the update. This can save countless hours of swapping drives or attempting to see who has which file and where it is located. Now it’s in one location and we all can access it at the exact same time.
The second key area is simple, cost. While there are larger SAN solutions on the market, they can be quite costly and can put you back $15K, $20K, $30K and higher just to have multiple users connected to a system that allows you to pull from the same footage.
With a Direct Network solution, your cost breaks down like this:
- Physical Hard Drive to Network (Let’s set the minimum at 12TB)
a) G-RAID with Thunderbolt (440MB/s – $1,000)
b) G-Speed Studio XL (1200MB/s – Price TBD) - Ethernet Card
a) 10GbE Card (For a much faster throughput connection)
i) Ideal for 4K Workflows
ii) Ideal for multiple users utilizing 4K
iii) Can be added at any time
iv) Purchasing used online will put you around $300-$350 per card
b) Gigabit Card
i) Works great for a 1080p Workflow, including multiple users
ii) 99% of all Desktop Editing Computers come with a Gigabit Connection already; therefore, cost would be included in the system.
Build a Near-Infinitely Expandable System
You have the ability to build a near “infinitely” expandable system with a Direct Network specifically with a Thunderbolt 2 setup. With Thunderbolt 2 allowing up to six daisy chained devices, you can pair up to six 64TB G-Speed Studio XL systems from G-Technology, giving you roughly 384TB of storage. Unless you expect to be moving to shooting 8K at 3:1 compression on the RED Weapon, you’ll probably be ok.
Consider this. With our content creation for Filmmakers Academy content, we create roughly 25TB of content in a calendar year and we are shooting five cameras at 5K 6:1 compression on the RED Dragon. Then we are cutting from the raw material on R3Ds and exporting in 4K. We end up blowing away whatever material we can, footage and takes we don’t use, etc. We’re creating more material than an average production house, who cuts and creates commercial work, and we’re operating on the same level of what a production company creating a feature film would produce in relationship to storage size.
The Next Step: Understanding the Tools Available
Getting everything set up properly starts at the basic level of understanding what tools you have available to you that will help you set up your system.
1 – The Computer!
Whether you are a Mac or Windows person, this system will work. Right now, I am going to go through the process of how to build it with a Windows system because this is the one that we chose for our facility. I will discuss some basics of integrating a Mac within the system, but it is not going to be the focus for our purposes here. This is partially due to the fact that with the new Mac Pro systems, you have to go into a lot more detail on how to add onto the platform with physical hardware because the new Mac Pro does not allow for PCI cards, etc.
Our Windows system is built on the HP Workstation Z840. We currently have two of them and we also utilize a number of HP Workstation Laptops in this setup as well. The Z840s are set up as our main editing/color grading systems. The laptops can handle a 4K and above workflow, but multiple streams can be challenging at times. This usually forces a lower playback resolution, whereas on the Z840, we are playing back 4-5 streams of 5K 6:1 R3D files in Adobe Premiere at Full Resolution. Sometimes we have to drop resolution once we start to adjust color or add effects, etc., but the lowest we are dropping is at 1/2 resolution.

HP Z840 Workstation Editing Computer
Forecast your future as best you can and model your tools around that
If you build a system that can only handle a 1080p workflow, what will happen when you need to move to 4K? Sure, you may never need to finish in 4K, but having the flexibility for visual effects or just having extra resolution when needed to stabilize a shot, etc. can make a world of a difference. As of December 14, 2015, Vimeo has moved into the 4K world with streaming and YouTube has been streaming 4K for quite some time now, even 8K! 4K playback isn’t coming; it’s been here. I can go on for days, but I think you get the gist of the idea. Your plan for now is your plan for the future.
2 – PCI Cards!
You’re setting up a killer editing/color system, so you may need some cards to put into those slots of the computer so you can output for a monitor, extra connectivity, etc.
Here are a few things to consider that are going to be crucial for your setup.
- External Monitoring
a) Blackmagic Mini Monitor – This is a perfect setup if your monitor is only a 1080p monitor. You can have a 1080p, 4K UHD, 5K or 6K and above timeline and the software from Blackmagic will down-convert to playback at 1080p on the output. You have the ability to use SDI and HDMI outputs on this card.
b) Blackmagic 4K Extreme Card – This is ideal if you are going to have a 4K monitor. Same as above except if you have a 1080p monitor and your timeline has a resolution above 1080p. We found out that our 5K timeline would not down-convert to 1080p for our monitor and playback via this card. This is something Blackmagic is looking into, but just be aware. This card also has SDI and HDMI outputs. - RED Rocket X
a) A no-brainer if you’re in a RED workflow and this will slot itself right into your HP Z840 system. This card accelerates playback and transcoding of R3D files within your system. - Thunderbolt Card
a) This is essential if you are going to build your Direct Network System and maximize your speed. The HP Z840 does not come with a Thunderbolt Card, but HP does offer a card for purchase. We included this when we set up our system. - 10GbE Ethernet Card
a) This is also essential if you’re looking to do a workflow above 1080p. The best thing to do is to look for a used card online. We found ours on eBay. Specifically for the Z840, these cards will work for you:
i) Dell X540-T2 Dual Port 10GbE Ethernet Adapter (Best for the Z840)
b) We are going with at least a Dual Port card because we are going to directly attach the first system to the second system by running a 10GbE cable between the two. Then we are going to run another 10GbE cable to our third system (in the future) which will come from the first system as well and run directly to the third system.
c) You could also run a single Cat7 cable into a 10GbE switch if you wanted, but it could be costly. This is where the advantage comes into play of directly connecting the computers together and creating the shared network. - 10GbE Ethernet Cable – Cat7
a) 50’ Cat 7 Cable on B&H
*One item to note on the HP Z840 system that we came across
There are eight USB 3.0 ports on the system, four in the front and four in the back. It looks great when you first see it, but you should be aware that they all share the same USB 3.0 hub. They are not individually dedicated USB 3.0 ports. This can be a bummer if you are using a USB 3.0 card reader and offloading footage onto a USB 3.0 drive, which is what we were doing prior to getting our Thunderbolt card and building our storage system. You could always add an additional USB 3.0 external card in an expansion slot to allow yourself additional USB 3.0 speed, giving you two throughputs (or more if you are able to get a card that has dedicated USB 3.0 ports).
3 – Storage!
Deciding which type of storage to get again depends on your plan for the future. If you currently have 8TB of files on hard drives that you use consistently, don’t go out and only buy enough to store those files. Look at what you have done as a business or individual for a calendar year, figure out a small average and then give yourself a 15-25% buffer of additional storage. Don’t let yourself get into a “pickle” and only have just enough to get by. It’s a long-term investment.
So what should you get? Have you ever heard of the “Production Triangle”? The old “Fast-Cheap-Easy”? Keep that in mind when you’re buying storage because ideally you want all three of those things with storage, but honestly, I would just focus on Fast and add Reliable and make it a duo instead of a trio of adjectives.

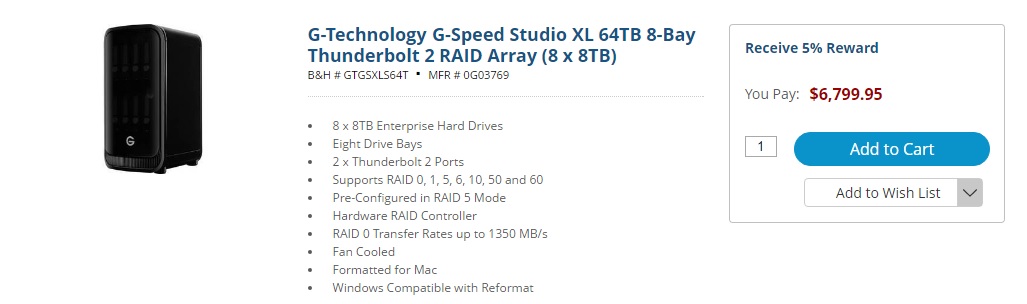
G-Technology’s G-Speed Studio XLs with Thunderbolt 2
Be Cautious of Cheap
Storage isn’t cheap, especially good storage. I’m sorry, but that’s just the way it is. Right now, you’re thinking about that 4TB drive you saw at Costco that was $119.99, right? You’re saying to yourself, it’s a USB 3.0 drive. That’s good speed. It’s pretty cheap. Yeah, let’s get it!
No. Please. Put it back. Just leave it wherever you are standing. I don’t care that you’re by the palette of Honey Nut Cheerios, just leave it. Seriously, walk out of the Costco.
Stop compromising your projects because of cost and your short-term budget. Long-term investments cost more because they last longer and are more effective in both the short-term and long-term; you’re paying for both, now and later. The cheaper alternatives barely even pay for now and certainly don’t do any good for later.
Understanding RAID Protection
No storage solution is made equal and spinning drives all have their flaws but solid state storage is still extremely expensive when you’re getting into large amount of Terabyte storage. Enterprise level spinning drives are still incredibly reliable, especially when you’re set up in either a RAID5 or RAID6 configuration (RAID configurations explained).
As you research more about RAID configuration, understand that one of these RAID setups allows you to have a physical drive go down within your storage system and because all of the drives are in a “RAID” configuration, you are able to recover the data even though a physical drive went down. Speed and performance can be affected depending on your RAID configuration as well. RAID5 and RAID6 both have the same performance on the READ portion of the files, but in RAID6, the WRITE portion can be significantly slower due to the additional RAID striping across the drive space.
In our setup, we chose to go in a RAID6 configuration because it gave us two levels of protection across the RAID compared to one level compared to RAID5. READ performance does not decrease and we only went down to a 50TB storage system in our 64TB G-Speed Studio XL to do the configuration of RAID6. I’d suggest RAID6 for the added protection layer.
Storage Option Recommendations
Thunderbolt is the way to go if you are going to have multiple users and you are going to work in a 4K UHD workflow. USB 3.0 just isn’t going to be fast enough because the USB 3.0 connection will truncate your speed and the drives aren’t going to be fast enough compared to what you can get from a Thunderbolt setup.
For example, the G-Speed Studio XL can top out at 1200MB/s on an Enterprise level disk speed of 7200rpm, whereas a G-RAID USB 3.0 with the same Enterprise level disk tops out at 400MB/s. A lot of numbers that may not mean a whole lot, but I’d suggest doing this just so it makes a little more sense. Download the Blackmagic Speed Test by going to the Blackmagic website and downloading one of the Desktop Video Updates. This way you have the option of both Windows or Mac.
Most people think that the Speed Test is Mac only but you can get it for Windows. Run the test on your internal Operating System hard drive to see how fast a READ and WRITE of a file would perform on your computer. This will give you an idea of what it would be like speed wise to work right off your internal hard drive and may help you understand the 1200MB/s vs. 400MB/s argument.
In our opinion, the G-Speed Studio XL is your best option for a few reasons.
- Fully expanded out reaches you to 64TB of storage (their website currently states 48TB but they should have large models coming with this new design)
- The lowest model starts at 18TB and can be expanded up as you grow
- There are two Thunderbolt 2 ports on the drive so that you can daisy chain devices
- The new Studio XL will have an “EV” option, which will allow for a removable RED mag reader. This will allow for the fastest transfer speeds of a RED mag to date.
- Up to 1200MB/s Transfer Speed. I did a little test on my internal hard drive on my laptop and I’m maxing out at 440MB/s on a 256GB SSD for my READ. This will be able to handle one stream of 4K playback somewhere in the neighborhood of 1/4 resolution, maybe less. Even if you start out at the 18TB system, your speed will be below 1200MB/s because this is the maximum speed when you have the system maxed out at 64TB. As you add physical drives in a RAID configuration, your performance increases, allowing faster transfer speeds.
A Direct Network Storage Solution for Post-Production
This is a great start to understanding what you will need for your Direct Network Solution. The idea in this system is to build something cost effective, which is where my point about having a 10GbE card with two ports is essential if you’re doing more than two systems. Or you could buy a 4 port card, which would allow for a maximum of five systems and when you need to go larger than that, you start looking into 10GbE switches.
One last note is that we are set up for three editing systems that can connect to the storage via 10GbE for the maximum speed and performance. We have also connected and shared the internal Gigabit connection of our main HP Z840 workstation, which then goes into our Gigabit network switch at the office, which was already in place. Even though this Gigabit switch is also tied into our internet connection, we are still able to connect additional desktop computers and laptops to the system and they can access the files at a Gigabit speed.
Stay tuned for Part Two where we will dive into the details of configuring your system, turning on sharing within windows, setting up your proper RAID configuration, drive formatting and everything else you’re going to need to know. Please let us know what questions you might have.

Technical Specs:


![]()


My big question is: WHEN IS THE NEXT ARTICLE GOING UP?! I built a system similar to this a few years ago built around final cut server and it was not fun. Really interested in the NAS file sharing part – as I understand that certain software is what enables those files to be accessed simultaneously without damaging their relationships?
I am sure I am not alone in saying that this article series is SO relevant to post houses with a little extra technical know-how not looking to spend a fortune in turnkey boxes.
Thanks so much for the information! this is critical information that not enough people are talking about! How are you setting up the mirror to the second drive? Is there software that automatically updates the file structure of the second drive to match the first drive if any changes are made?
Right now we do not have a mirror setup. We had to chose to use the second drive for additional space. But since we are in RAID6 I’m not concerned about not having a 100% backup. We have all of the footage backed up on other drives that are vacuum sealed and kept offsite, so if we went down, we could recover in a few days.
Just echoing everyone’s sentiments here. Please post the additional information as soon as possible:)
I want to just double-echo everyone’s sentiments! Wonderful information and looking forward to the next post. Thanks!
Can you build a set up like this with Mac ?
It would cost to much to switch to PC after spending money on buying macs
Yes you can, pretty much the same setup as for a PC. Just don’t format the drives in NTFS. Otherwise the Macs won’t see them.
Hi , first thanks for doing all this work for us out there!… i do wonder though what the workflow and hardware was with the Blockbuster movie Terminator you did, and not what the workflow and hardware is for your blog and schooling here.
What machines and what software (Avid? ..or Flame ?…XY ?) and which workflow went into the TERMINATOR movie, is what we all would like to learn . Correct me if i am wrong here, but your single HP machine and 2 Thunderbolted G towers would not even be able to process the dailies from your movie Terminator,….correct? …. awaiting eagerly your reply,..Akos Simon
Hi Shane, thanks for the info as always. Can you talk more about your offsite storage? You mentioned you have drives that are vacuum sealed? Didn’t know that was a thing! Any advice for people who are juggling lots of footage and looking for an archiving solution – – just in case your local storage goes down? Are there any infrequent access online cloud storage services you recommend? Or would you recommend a certain type of physical drive in an offsite location? Thanks for all you do.
Nice Post. Thanks for sharing it………….:) :)