Post-Production: A Direct Network Storage Solution for Editing & Color Grading (Part 2)
By David Weldon
Recently, we introduced the tools you are going to need to build out your Direct Network Storage Solution. As Shane would say, now we are going to “dive right into the fire, head first!” Haha. We’re going to walk through how we built our system here at Hurlbut Visuals.
We had some much-needed help in this process. I want to make sure that I make you aware that this is not a “plug-and-play” type of setup. Shane called an old friend, Mike McCarthy of Bandito Brothers here in Los Angeles. Mike is a Technical Engineer, Guru, Savant. You name it, this man can do it. He’s brilliant. Mike also set up a similar system for David Fincher building out Fincher’s editing team with HP Z840 workstations and a Direct Network setup.
I would highly recommend enlisting someone like Mike McCarthy in your area, someone you know or know of who is extremely proficient in this area of technology. Mike has a great blog himself on the technical work of computers, networking, and a lot more. Check it out: HD4PC.
Our Objectives of Creating this System
Many of you may be familiar with the terms NAS (Network Attached Storage) or SAN (Shared Attached Network). These are two setups that are relatively similar to each other, and they essentially allow for multiple editors or colorists to connect to the same area where the footage they need is located. Thus it is referred to as the connection being “shared.”
With a NAS or SAN, you would use a network switch like this one to connect multiple edit bays or color bays to work off the same system. Your NAS or SAN would connect into the switch, and then the individual computers would connect to the switch, completing the connection.
Depending on what type of system you get and what type of network cards you put in your computers, this can get costly. The switch we are showing here is already putting an extra $3,000 into your budget, but you may not even need it depending on the size of your operation.
Our main goal is to create a system that is cost effective to our needs while still delivering power and performance across the network to each edit/color bay.
Building via 10GbE Direct Attached Storage
If we were to build our system via the NAS or SAN route, we would end up spending additional money and resources on:
- Free standing storage controllers and storage arrays
- Fiber switches and sards
- Block level SAN sharing software
With a 10GbE Direct Attached system, we are going to accomplish the same goal but using the standard sharing technology that is already available to us within Windows or Mac OSX.
Here is what has to be done:
Step 1: Install your 10GbE Network Cards
You’ve purchased your 10GbE Network Cards off of eBay and you’re ready to install them.
Pop open the side of your HP Z840 Workstation by opening the handle towards the top.
Take out the ventilation system to reveal the PCI slots.
Locate one of the x16 lanes, which will be a preferred lane to use. A “lane” is built out of two different signal pairs, one pair for receiving data and the other pair for transmitting data. Each lane transports data packets in eight-bit “byte” formats at the same time. Imagine a highway with multiple lanes going in different directions, only the term “lane” would mean “highway.” You could also imagine your internet connection. The downstream and upstream use the same internet connection but two different sides of the connection.
Go ahead and install the card.
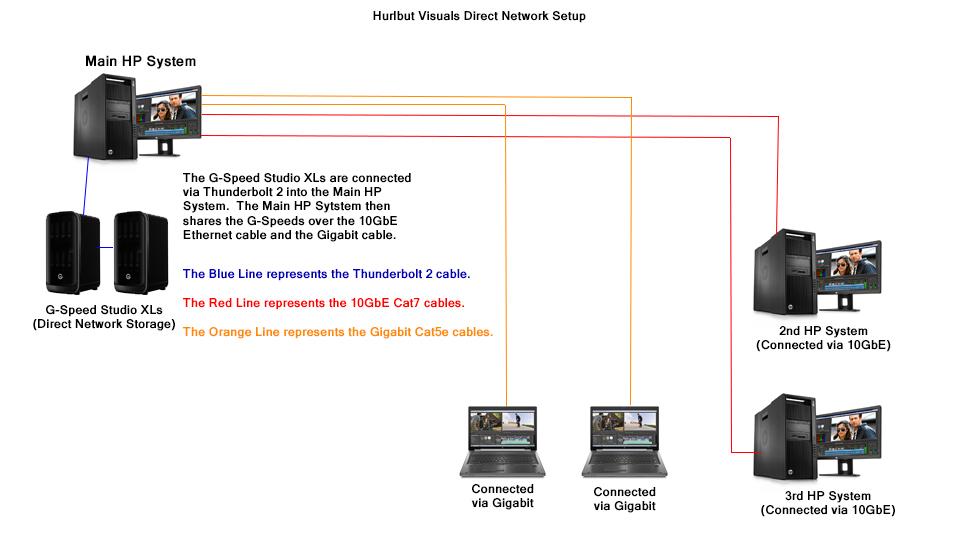
Because you are using 10GbE cards, this is where the Cat7 cable comes into play. You are going to connect the first computer to the second computer via the 10GbE. If you add more than two computers in the chain, you will have to make a decision on how to link them, which we will get to later.
Step 2: Setting up your Storage Arrays – G-Speed Studio XL
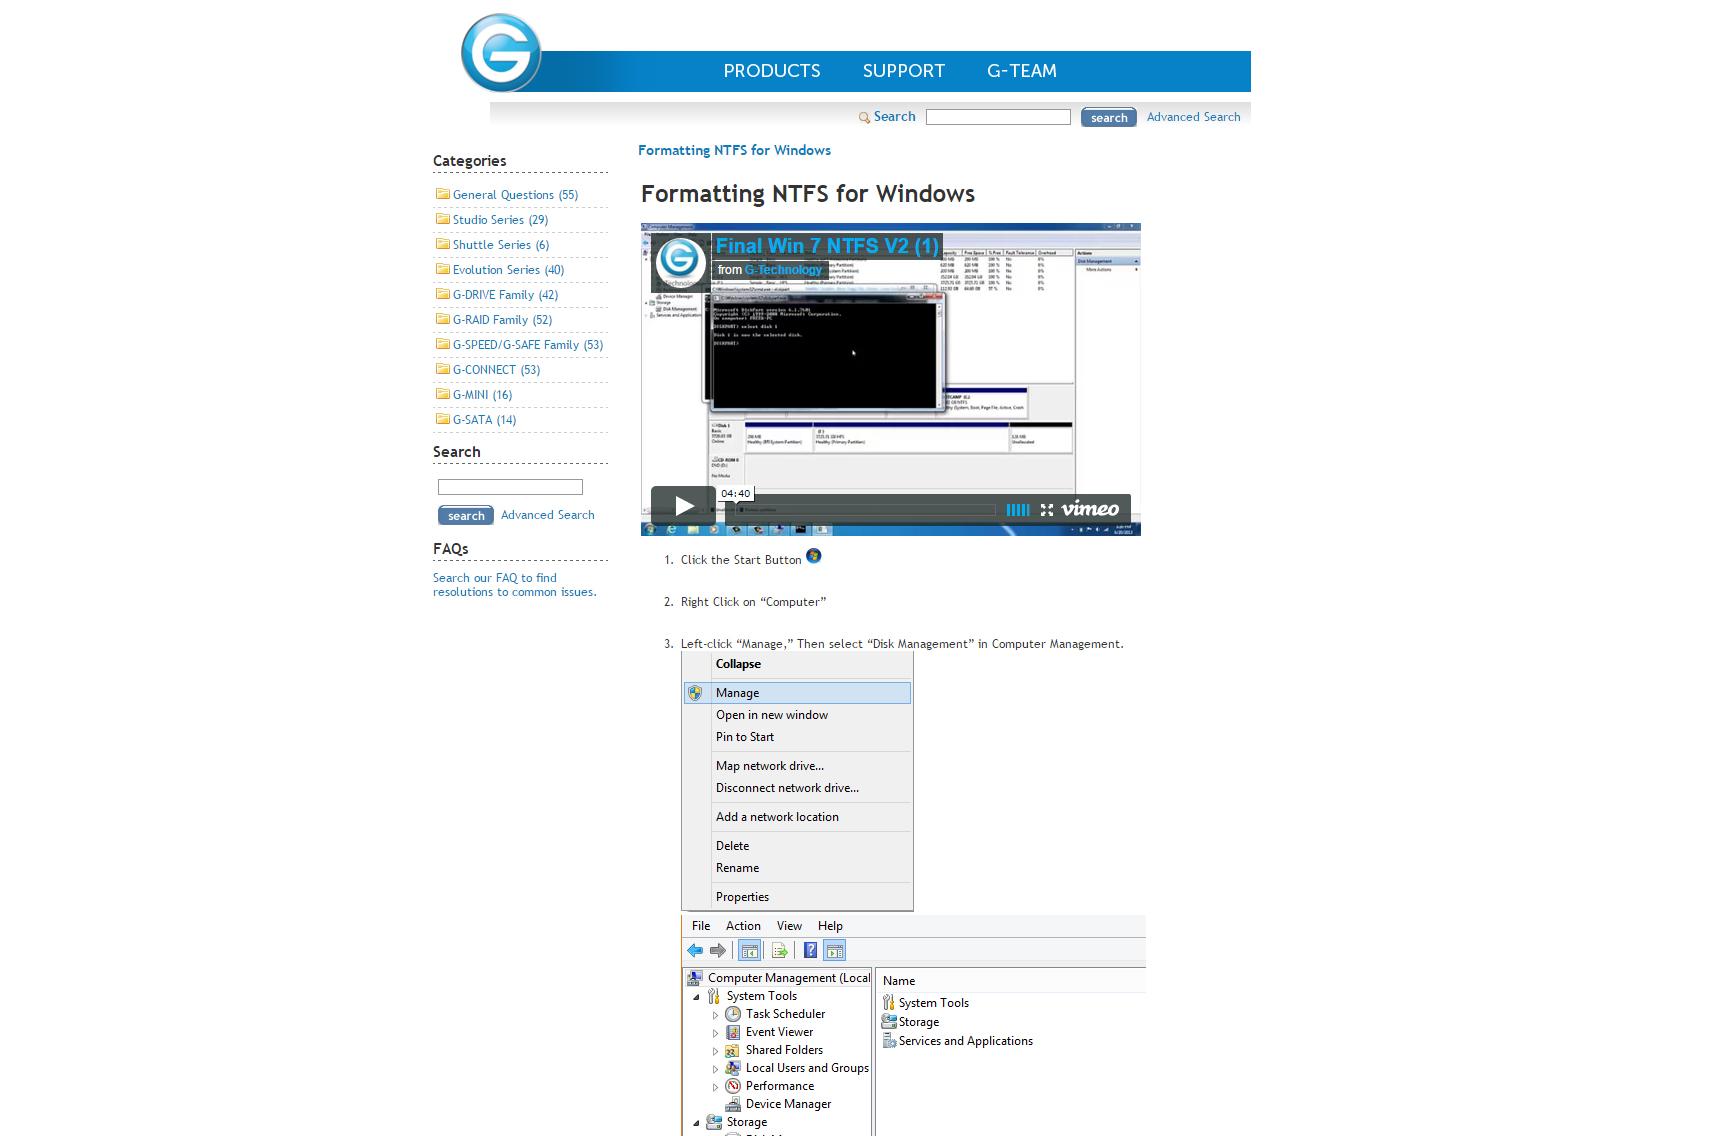
If you are building a system around Windows and using HP Z840 Workstations like we are, but you want to keep the option open to integrate a few Mac computers, it’s not going to be a problem. You will format your G-Speed Studio XL to Windows NTFS so that the Windows computer that will be the direct connection (via thunderbolt) will see the array. Once you share the array across the network, each computer will just dial in via a network connection and it will not matter how the drive is formatted.
NTFS is going to be the most stable and secure for Windows. Mac OSX Journaled will be the most stable and secure for a Mac only setup. We oftentimes format our G-Raids in ExFat so that both Windows and Mac computers can see the drive, but that isn’t necessary here.
G-Technology Step-by-Step Breakdown of Reformatting for Windows
Once you have formatted the G-Speed Studio XL into your HP Workstation Z840, you will install and launch the G-Speed Studio Software (You may have to download the software). Within the software, you will have the ability to check on the status of your array. You’re going to want to monitor the drives for heat issues and just overall performance as well.
Step 3: Networking Your Array
Each direct connection is a completely different network. Each needs its own subnet for the system to know which traffic to send to which physical port (the 10GbE cards in each computer).
Normally your main network for internet is set up at 192.168.0.xxx or 192.168.1.xxx. To keep it simple, Mike set it up at 192.168.10.xxx for the 10GbE links. But if you are going to add a second array (like we did) you will need to add to the chain, so it will need to be 192.168.20.xxx or .30.xxx or whatever you choose.
Now each 10GbE port on the cards you installed needs to have a unique static IP address assigned to it. This means that this address will never change. It will be a unique link to that individual system.
Mike chose to keep the last number of the address consistent for all of the IPs on a single system to keep things simpler to remember.
Maintain Consistency
When you are mapping across the network on Windows, it is helpful to use a consistent letter across the system for any given array volume. Mike chose to start us with Z: and then Y: for our second system, working backwards, so that there would never be a conflict. Normally when you plug in a drive, Windows will automatically generate a drive letter and it will start from A and work to B, etc. on an automatic basis. Unless you plan on plugging in 25 other drives at the same time, Z and Y are a good starting point. You do this by going into the Disk Manager on the system that has the drives physically attached to them (via the thunderbolt connection).
By mapping the same drive letter across the network, allows programs like DaVinci Resolve or Adobe Premiere to open projects on any system and the media files will always be found on the same network path.
You will map the shared storage using the IP address instead of the system name to force traffic to go over the 10GbE link. For example, “192.168.10.101BigArray” to see the drive on the second edit/color system. If you choose to have a third system in the setup, your path will be something like this – “192.168.20.101BigArray” due to the subnet of the 10GbE link.
Dialing in the Network Settings
Now you are all physically connected, which is the easy part. Now we have to dive into setting up the system as far as IP configurations and making sure that all of the labeling is correct. Let’s go through this step-by-step.
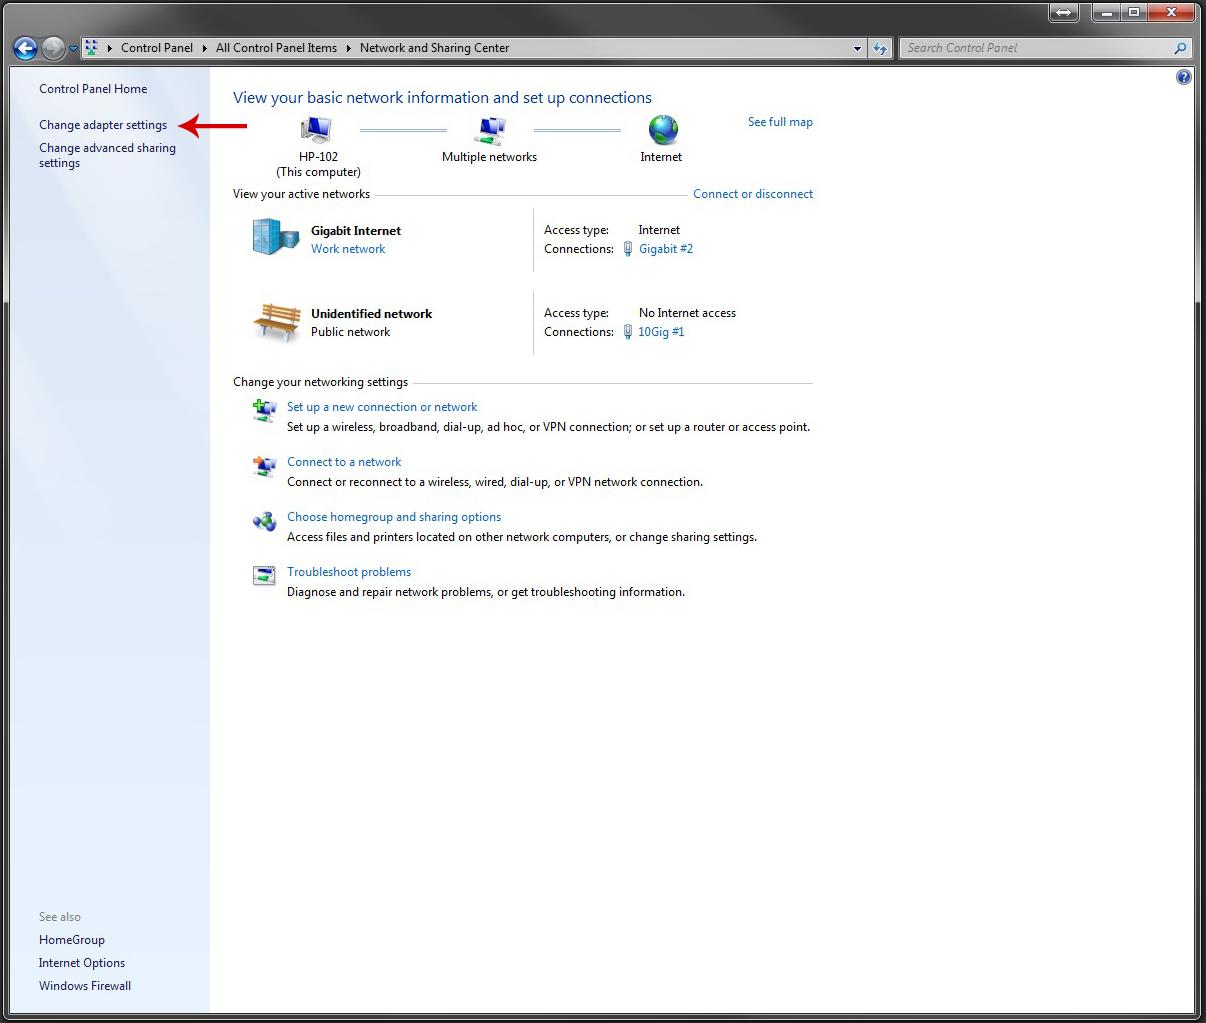
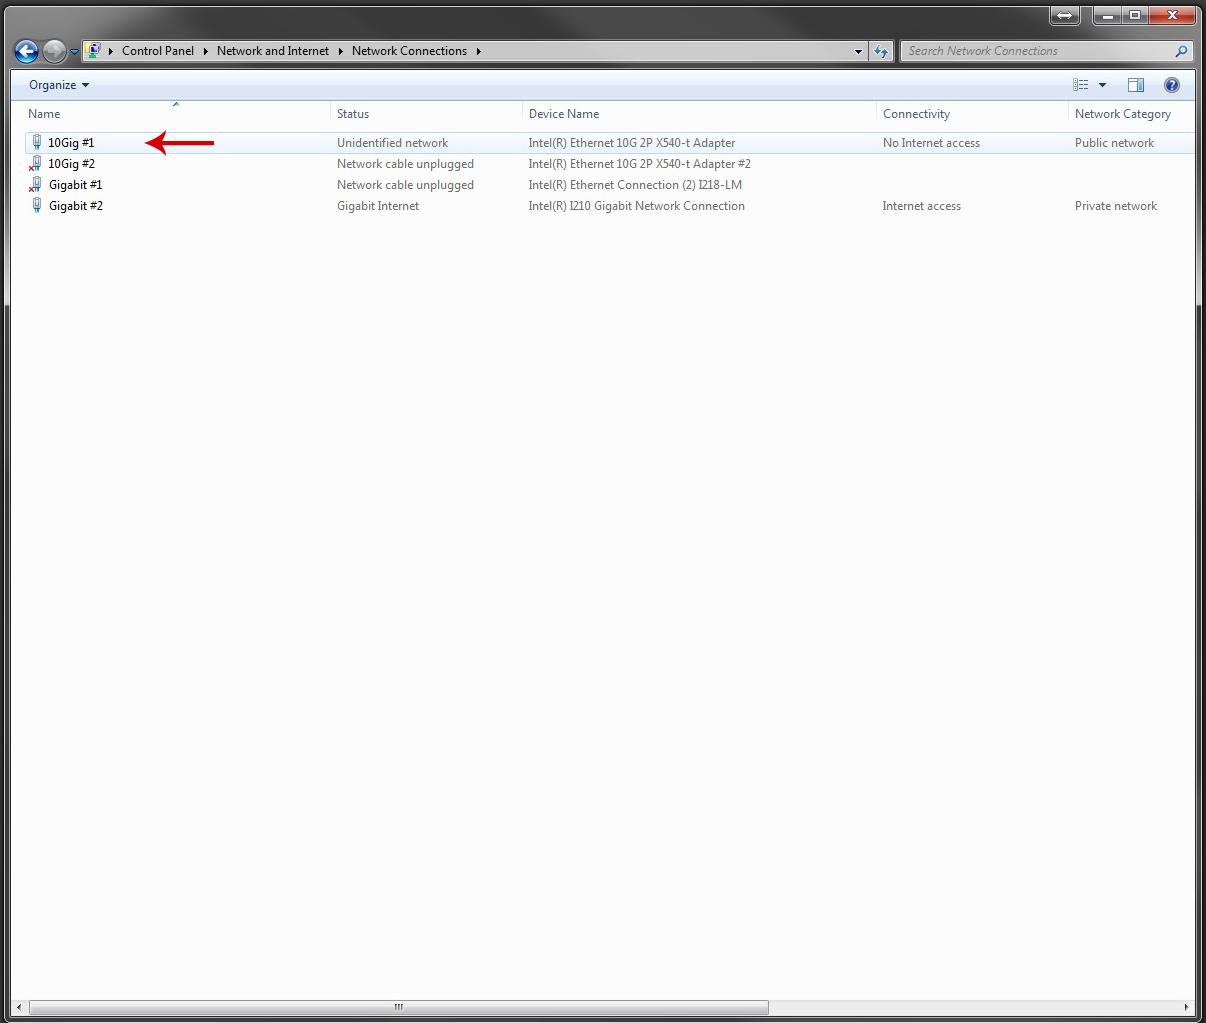
1: Go to the Control Panel
2: Click on Network and Sharing Center
3: Select Change Adapter settings on the left
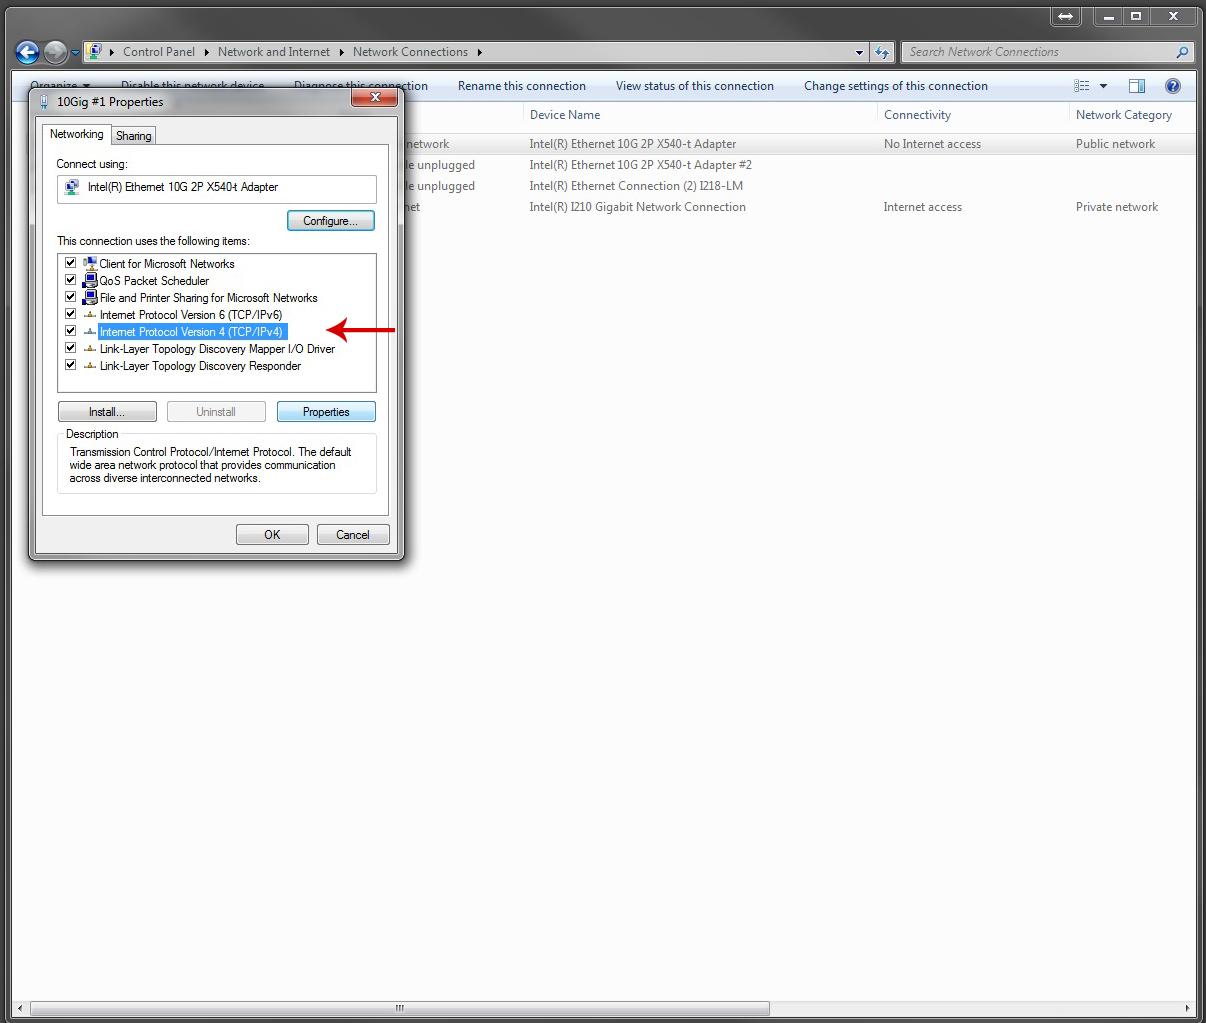
4: Right Click and Select Properties on the adapter you want to set.
This will be either the 10GbE port or the Gigabit port you set. Since the cards we purchased have more than one 10GbE port, make sure you are selecting the correct port.
5: Select Internet Protocol Version4 (TCP/IP V4) and hit Properties
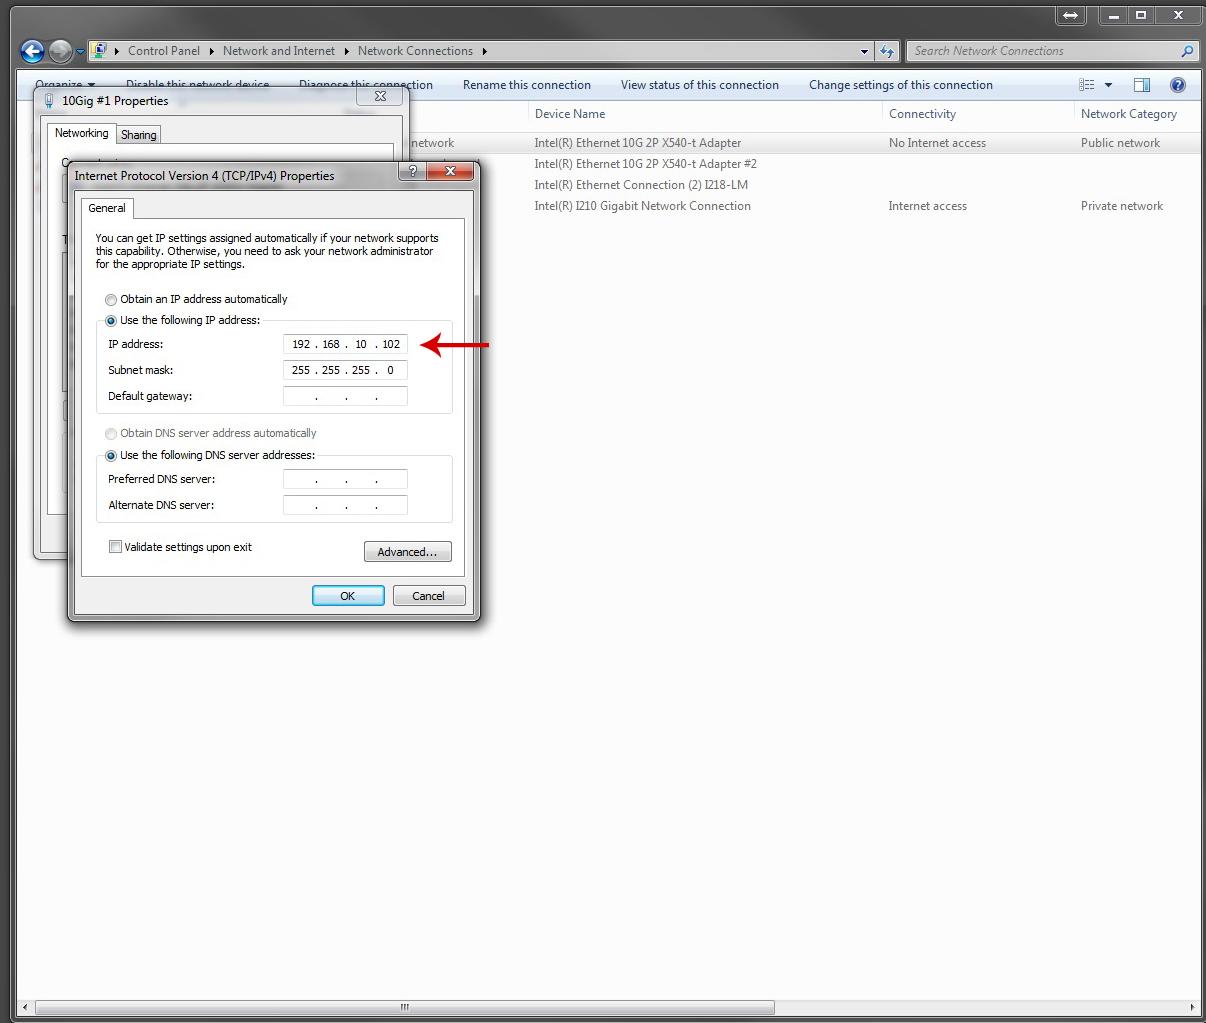
6: Set the IP address in the window that pops up.
In this case, it is 192.168.10.102. This is the second computer on our system, running through the 10GbE card.
Now you can follow the same steps if you plan to use a Gigabit network setup. We ran both the 10GbE and a Gigabit network so that we could run the Gigabit through our current Wireless Router, and this way we could have other computers connect via Cat5 Ethernet, allowing access to the server and being able to see all of the files.
The Gigabit connection is recommended for anything 1080p and below.
The 10GbE connection is recommended for anything 5K resolution and below. We are optimizing our 5K playback of RED footage using RED Rocket-X cards as well. Otherwise, we would have to lower the resolution to the lowest possible and even then, it may be difficult to playback.
I want to stress that while this seems simple by following these directions, you may run into little bugs and issues with networking connections here and there. We had a little trouble in the beginning because we also used our Gigabit connection to send to our router that connects to all of the other Gigabit ports in our office. This way we could plug in laptops or other computers, as I mentioned previously, but because this connection is going through the internet, your Windows network may give you a little trouble. It is really based on a case-by-case basis. This is why I highly recommend having someone help you setup and build this out. For us, that was Mike McCarthy of Bandito Brothers.
There are many ways to share your storage and connect within your office. For a small business setup looking to move efficiently and effectively, this is a solid way to go. Obviously, when you get bigger, you can expand your storage and add a larger 10GbE card on the main system to connect to other systems. Once you get beyond eight to ten users, you may want to look into the SAN solution process.
One Last Thing
There is one last configuration idea that may help speed up your process if you choose to. If you build your system with two G-Speed Studio XL Arrays, you can increase performance by splitting them up. What I mean is:
Your Edit/Color Bay #1 has 1 G-Speed Studio XL connected via thunderbolt
Your Edit/Color Bay #2 has 1 G-Speed Studio XL connected via thunderbolt
You then connect those two computers via a 10GbE connection. This will allow you to export and render across the network. We opted not to go for this setup because as you add computers, it can make it a bit more cumbersome to make sure it is all connected properly. We tried to build a system that is simple to understand so that it is easy for someone else to see how it all connects. This is why we have both of our G-Speed Studio XL Arrays connected to the same computer and then we send the connections from there.
Previous articles on this subject:
Foundations for Workflow, File Management and Post Production >>
Technical Specs:










Being an IT guy who moved into film-making, I have built systems like the one above, so if you have such a “problem” and are in the Switzerland region, feel free to ping me.
Some comments concerning the solution detailed in the blog:
– Getting two or more decent workstation level GPUs (i.e. Nvidia Titan-X, Quadro M4000/5000) is probably cheaper and more versatile than getting a RedRocket. My system with 2x TitanX can easily deal with RedRaw 5K, the limit is the storage speed, not the rendering
– I would definitely add in an LTO drive in your “main workstation” for backup and archival. Using external (USB/TB/FW/eSATA) harddrives as backup is a very, very bad idea…
– If you want to go into slightly more luxury territory, you should probably go for a dedicated central server with a server operating system (Linux, Freenas, Win Server, …) and an automated backup solution (it’s really worth it, in the end, because, let’s be honest, nobody does backups consistently when things get busy…). Also, that way, if you screw up on one of the workstations (especially the one with the directly attached storage), your data should be safe(r).
– I wouldn’t do SAN or FibreChannel, it’s not worth the cost unless you really want to scale up things (but then you would buy a turnkey solution anyway and not fiddle around with network settings *grin*.
David, this has been an awesome set of posts.
Now that you have this all set up, how has your workflow changed?
Are you just dumping everything in giant folders and people are grabbing stuff from there?
Are you sharing the same footage in multiple projects?
Has anyone tried something similar taking footage “offline” in terms of grabbing projects to edit on the road, etc.
Yes, we are creating folders that keep the footage organized for good. Imagine having one hard drive that you use and that file structure and now sharing it with 10 people, but you don’t have to physically move the drive around. You just dial in and connect to it on the network. This has allowed us to create content for Shane’s Inner Circle. We wouldn’t be able to do so otherwise. We would be at the mercy of attempting to make copies of everything all the time, buying more drives and passing things around, which just wouldn’t work. We create 30-40TB a year on Inner Circle content. There is no way we could make that work for our content creation team. Yes, we share the same footage in multiple projects. That is the whole concept behind network shared storage. You’re creating a “path” from your NLE to the footage and your project file just points to the footage. We have done some offline work by just copying the needed material to an external drive.
First, thanks for this series. This type of content is exactly what I need.
Any tips on implementing this setup with 2 iMacs and 1 Studio XL? With no way of adding additional network cards, would a thunderbolt hub for each computer do the job?
Hi Shane.
I just discovered this article and it came as an answer to our prayers for the problem we need to solve. Have you got this very same case scenario on a Mac environment? We´ve got pretty the same config on a Mac Pro / iMac room.
Thanks for the articles, very enlightening. I’ve been trying to figure out a relatively inexpensive solution since we bought a RED Weapon a few months ago and the central server we had been working on can no longer handle the bandwidth. For the last couple of months, we have been working off of dedicated external Glyph SSD dives. The problem of course, is that things get messy and cumbersome when you have to share parts of the project to SFX, color, sound, etc. I was pleased however that we’ve been able to edit the 6k R3D’s without lag or dropped frames right off the SSD’s attached via usb3.
It is mentioned several times in the two articles that the system you describe is built to optimize 5k footage. My question then is would the G speed and 10gbE have enough bandwidth to edit 6K R3D like we’ve been used to doing with our SSD drives? We are just a group of 3 running 12 core mac pros without RED Rocket cards.
Thanks again for your help.