UNLOCKED: How To Program the Iris: Preston FIZ
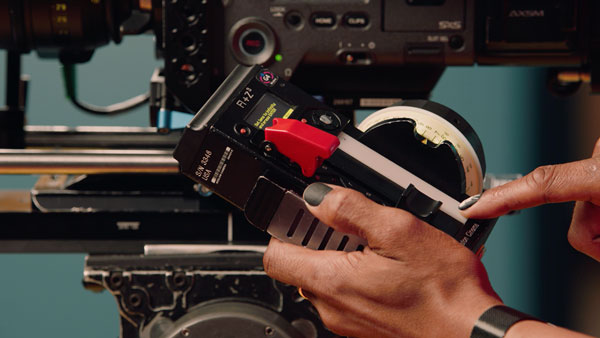
1st AC Derek Edwards shows the details in the handset that you need to optimize the Preston FIZ. You can add a single channel to the mix which takes over the iris so the director of photography can view it in the video cart.
Let’s get into programming…
You’re going to learn:
|
STEP 1: CALIBRATE IRIS BY PRESSING CALIBRATE ON MDR
Derek goes back into the menu and affirms that the lens is already up. He chooses the lens and selects Edit Lens. He then chooses Calibrate Iris and taps OK.
 |
 |
From that point, go into the handset and it is preset with all of the stops on your iris.
STEP 2: CALIBRATE THE HANDSET BY MATCHING STOP POINTS
Derek calibrates the iris. The handset is looking for a 1.5 but there is no 1.5 on the lens, so he takes it to the closest mark, which is a 2.

Then, it tells Derek to go to a 22 and sets the iris. He then takes it back to infinity on the lens and calibrates it. Derek checks to ensure that it is reading his iris from a 2 to a 5.6.

| PRO TIP: On set, Derek uses a piece of tape to label all of his iris stops. |
STEP 3: MAKE SURE THE MDR & HANDSETS ARE ON THE SAME CHANNEL
Derek powers up his single channel.
Derek realizes that he is on the wrong channel. To make them work together, he will next put them on the same channel.

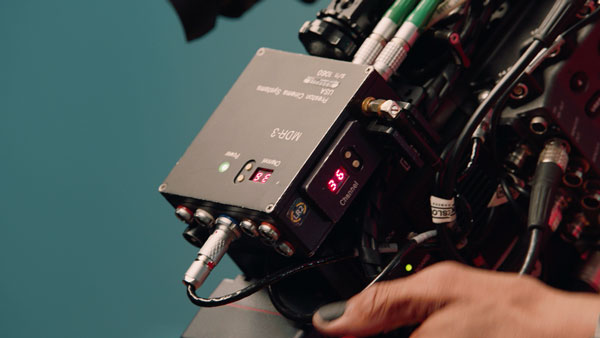
As you can see, the channel for the MDR and hand unit is on the back and the side.

It reads at Channel 36. So, Derek must plug that number in for the handsets and units to work. It already reads Channel 36 on his hand unit.

Now, Derek will change the channel on his unit to 36.

Then, the link pops in and takes over so now Derek has iris control.
STEP 4: USE TAPE TO MARK YOUR UNMARKED RINGS
The ring Derek has is not pre-marked. So, Derek pulls his ring off the handset and takes a piece of tape.
Then, take your tape, set it to the ring, and lay it nice and neat.
| PRO TIP: You probably won’t need the full width of the tape. Make sure the width approximately matches the width of the ring. |
If you want to change directions, pending on your DP or DIT (whoever is controlling the iris), you can also return to the MDR.
Derek demonstrates what the motor does so you can see for yourself.

He presses it once and then twice. You can see that the iris flipped direction and recalibrated the iris.

As Derek calibrates his widest lens to close, it’s a natural turn on his knob.
STEP 5: LABEL LENS STOPS ON THE RING
At this point, you’re not done. Next, you help out your DIT by labeling the lens. Derek goes down the line, starting with a 2 and continuing to 2.8, 4, 5.6, etc. Then, of course, make sure to include little hash marks.

By now, you have self-marked the lens. You can do this on focus or iris on your hand unit. For focus, you can mark your own lenses either way or get pre-marked iris rings.
| PRO TIP: Pre-setup at prep so every lens is ready to go. On many sets, the rings don’t match so it’s best to save yourself time and a headache by labeling the rings in prep. |
Follow Focus System: Preston FIZ
Master the Preston FIZ Follow Focus system!
- 4 Lessons
- 30+ minutes of instructional videos
Follow Focus Systems: Preston FIZ explores the finer details of the follow focus which Key 1st AC Derek Edwards equates to his old ‘95 4Runner because it’s always dependable.
From inside the prep room, Derek demonstrates the Preston FIZ and how to calibrate it with your lens, recalibrate when you swap a lens, program its iris, and calibrate specifically for a zoom lens.
- Detailed Written Breakdowns
- English Subtitles
Module 1 — Preston FIZ Focus System
- 01-How to Calibrate Preston FIZ Remote Follow Focus System
- 02-How to Swap a Lens and Re-Calibrate the Preston FIZ
- 03- How to Program the Iris of the Preston FIZ
- 04-How to Calibrate a Zoom Lens with the Preston FIZ
Access the complete course to learn how to calibrate and program the Preston FIZ!

