Diffusion for the Digital Age: Using Fogal Stockings On Your Lens
When director Rob Cohen asked me to collaborate on an HBO film called the The Rat Pack, I was excited and scared senseless at the same time. This was to be my first narrative work. Music videos and commercials had gotten me to this point, and it was a music video that attracted Rob to me.
We sat down after reading through the script several times, and he asked me what I thought the visual language of the film should be. My gut reaction was that their whole life was a stage performance and that they were movie stars when movie stars had clout. They were untouchable, not hounded by paparazzi or TMZ; they had elegance. Let’s shoot the film in a way that they will look and feel like they are always on stage, in a subtle way of course. Always the perfect back light, the perfect key light, etc.
I brought out books by Hurrell, who was an amazing movie star photographer who started back in the late 1920s. He used a high key where he spotted lights on the star’s faces and used overexposure. He also used this amazing process where when he printed his black and white poses, Hurrell would vibrate the printing paper, which was his style of diffusion. That vibration would soften his very harsh lighting, because there wasn’t any 216 or gridcloth. This process was brilliant. They looked so glamorous and stunning.
“Nice legs”

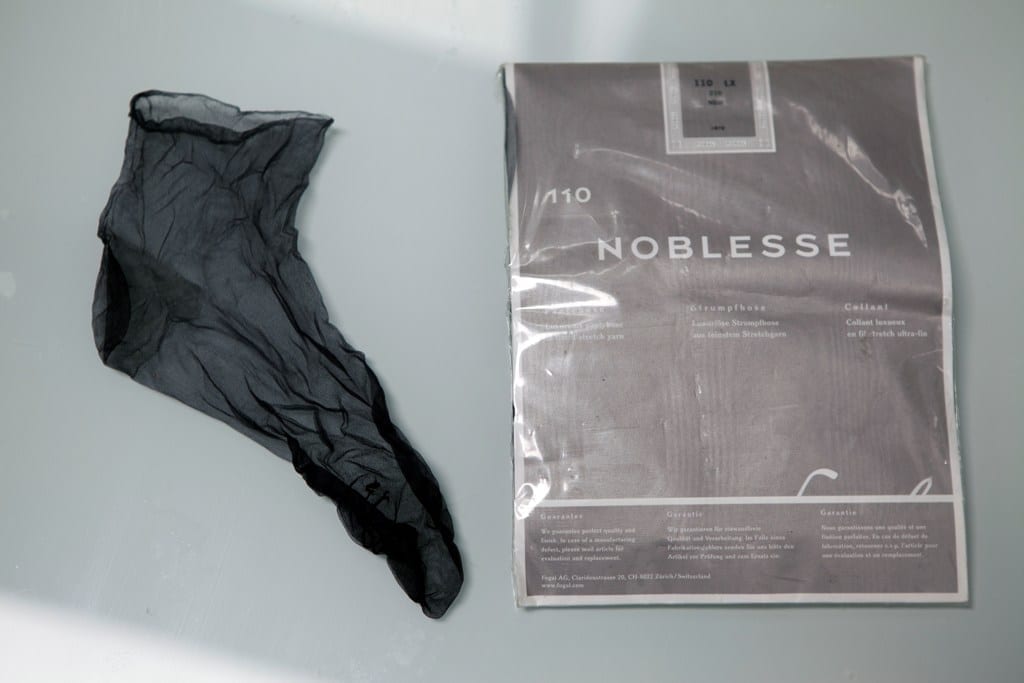
Noblese 110 Noir fogal net stockings
Our interpretation of this process was to use a brand of women’s stockings from Paris, along with overexposing the faces 2.5 stops to get this mood, feel and stylized look. The Fogal net was different than all the other stockings that we researched. There was not a pattern per se. It was more random, with these beautiful little black burs that were stitched into the stocking. This particular stocking glows highlights beautifully, pearls a woman’s face and softens the image slightly. Rob and I thought that would be perfect for this period film.
Let’s Get Techie about Stockings
The stocking goes onto the back element of your glass. You apply it with 3M snot tape, industry term for double stick ATG tape. 1/4″ or 1/2″ wide can be used. Basically, you strip the tape off and wrap it around the circumference of the rear element.

Carefully placing ATG tape around the rear element
Once that is secure, you use only the leg portion of the stocking. Now this is where it gets really creative and magical. The diffused effect that you get depends on how much you stretch the stocking, aka net, across the element. You can get more of a diffused effect with a light stretch, or a less diffused look if you stretch it tighter.

Netting placed around the rear element
On The Rat Pack, I had only one guy stretch my stockings. That sounds a little bizarre, but you want consistency. Once you see something you like, you go with it. The director and I loved what my 1st A.C. Gary Hatfield had done in the test. He called it a medium stretch.
You lose anywhere from 1/3 to a 1/2 stop with the net on. When you net longer lenses, you give them a tighter stretch because the longer lens compresses the pattern and increases the level of diffusion. This is why there are different levels of glass diffusion. On wide lenses, you shoot with a three, and on tight lenses, you shoot with a one. It is the same with stockings. We actually found a cheaper stocking that was good for going over 135mm. This looked great because it was thinner.
The Stockings Test
I wanted to show you some examples of the net on and then off on the C300 PL. Elite team member Derek Johnson will be heading this test up and take you through it.
For this test, we used the Canon C300 PL and two Zeiss Master Primes 25mm and 75mm. We used ATG or “Snot” tape and carefully (emphasis on carefully) placed it around the rear element of the lens. Then we did a tight stretch with the netting around the rear element and cut it into place. We setup a variety of sources: fluorescent, tungsten and halogen at varying wattages for a strong backlight to see how they reacted to the Netting behind the rear element. It created a dreamy glow around sources and very cool looking dichroic aberrations from pin point sources. Actress Jannese Davidson was our model to show how this technique creates a very pleasing look for females on camera.

Setup to shoot the Fogal net test footage on the Canon C300 PL

Canon C300 PL with a Zeiss Master Prime

Notice the glow of fluorescent light on the left and Dichroic aberration of the spotlight

Screengrab of a closeup shot using the Fogal net diffusion technique
The Rat Pack
Let’s go through a few scenes from The Rat Pack that really showcase the unique organic abilities of the Fogal net. I remember the glow that was created when I hit them on stage with the bright follow spots. Their tuxedo shirts exploded; their faces glowed; the lights in the background had a halo around them. It just looked sexy; they looked handsome; they looked like movie stars.
After the success of The Rat Pack, Rob Cohen got another film produced by Neil Moritz in Toronto called The Skulls. It was a thriller set at Yale University, behind the illustrious doors of the Skull and Bones secret society. Rob wanted the same look as Rat Pack. It was my first studio feature, and it was comforting to do something that I had already cracked because I knew there would be many more hurdles to jump. The added diffusion gave the film a very different look from all the other teen beat thrillers that had come out. It was so fun bringing this world to life — secret rooms, catacombs, power, intrigue and greed.
When Joshua Jackson’s friend, played by Hill Harper, is killed, the entire cast of characters attend the funeral. This was a monster to light. The ambient levels were constantly changing as the clouds moved across the sun. I brought in two LRX light trucks to blast sunlight through the golden stained glass windows at each end of the church, along with 15-18K’s to glow the windows on the left side. I loved the look of this cathedral. It was so majestic. Notice how their faces glow as the rich warm light hits their faces. I overexposed their faces 2.5 stops and also used a Tiffen Antique Suede number 3 filter to add that golden look.
What kind of stockings do you use?
What ways do you use diffusion?
We’ve got this bundled up with some other great articles on DIY lighting. Learn about metal halide sports fixtures, the headlight gag, DIY bounce solutions, how to build the perfect key, and more!
Get The Filmmaker’s Guide to DIY Lighting now!


Shane, that was an informative comparison. Thanks for the tips.
You say “be careful” about the Snot-tape. How risky is it? It is a difficult thing to get right the first time?
Thanks for the support John. It’s not risky as long as you are careful, I just said that because scratching or getting any tape on the rear element is not a good idea.
what about just closing the lens over an uncut/untaped stocking? sure it’d hang weird but if the tape is dangerous to the glass…
Great post! We are having here an online film school! Love it! Keep on!!!!!!!!!
Thanks for the kind words and support Alex
I love this stuff. Stockings are a great cinematography tool and there’s a sort of witchcraft about not only how much stretch and what brand to use, but also color selection. White stockings can lend a cool retro halation. Pinks and apricot colored stockings can do double-duty evening out flesh tones. But I have to agree that the black stockings are the best all around.
Another advantage of placing stockings behind the lens is that it is one of the only ways to get lens filtration on a very wide lens without using a matte box.
Douglas Horn. Thank you so much for your insight. I never used different colored stockings, I will have to try that out.
Nice , Nice and Nice !
Amazing post ! you rock Shane !
Thanks,
M
Thank you Matheus for the kind words and support.
Another amazing post. Is it possible to net EF lenses, or does it get in the way of the electric communication?
Hi Shane, thanks for an insightful post and sharing a little history of how you started.
I’m working up the courage to net my lens.
With the diffusion filters out there, is there a compelling reason for this lo-tech approach?
Hi Baron, netting the lens is much more organic and you don’t get double imaging and weird flares like you would with glass filters. I prefer using nets and smoke to glass diffusion, but it comes down to using the right tool for the look you want. Stay posted I will be writing a post on Glass diffusion in the future.
Thanks again Shane. Really enjoying these series of blogs.
Thank you for the kind words and support.
Wow, this is fantastic information! Shane, I’ve been following your blog and am shooting with the new 5D Mark III. I’m having problems with banding in the sky when I do wide shots. Is this stocking technique you describe here a good way to prevent that problem for the 5D? Is there a better way? How did you combat sky banding for Act of Valor? Thanks so much!
John Marc Green.Thank you for the kind words and support. Sky banding results from the 8bit color space of the camera. Dark energy’s noise removal and texturing got rid of most of the banding in Act of Valor. They are now releasing a $500 plugin for After Effetcs in July. .
Thanks for sharing! Awesome insight Shane! But I have a question: In the side by side comparison wider shot, with and without the net, the image on the left (with the net) seems to have a sharper background. Would you know why?
thanks again.
Amos Kim.Its just a depth of field difference because we shot at a higher t-stop with the net. Which gave us a deeper depth of field.
Any reason you closed down the t-stop when switching to the net? I thought it was better to work on the open end of the iris with netting to make sure it doesn’t show itself.
Thx, Misha
Misha Mazor, yes, it is very important to keep your f-stop a 4.0 and under.
Love it Shane. I had forgotten about this trick. My first job out of high school was managing a broadcast rental department, and we were forever pulling stockings off the back of lenses when gear was returned from TVC shoots. I had to get one of the DOP’s to explain what was going on. The other one was having to clean vaseline off the back element. Used to soften wrinkles on ECU’s. That’s the thing I love about old school tricks. Sometimes the old tricks are still the best tricks!
Hi Alister, thats exactly right. Thanks for the comment and support.
These have been around for years for B4 mount lenses: you need them to make one of these for your Master Primes – it’s easier – and you can preload a bunch with different stockings and swap quickly….
http://www.filmtools.com/iring.html
Thanks for the link and comment Chris.
Hi Shane, that’s awesome! But is it really the way in the Digital Age? You can diffuse highlights in post with various software filters I’m sure. Have you tried that?
Hi Wurb. It is always better to create a look in camera than doing it in post.
Heya Shane/crew,
Love the blog, have learned so much over the past few months. I find myself
looking online for more content to feed the passion. If you could name a few – which books, cinematographers, or blogs do you personally recommend?
Thanks! ~ D.
Hi Duane. Some good blogs to read are Vincent laforet’s http://blog.vincentlaforet.com/ and no film school http://nofilmschool.com/. As far as books go Painting with Light by John Alton and Writing with Light by Vittorio Storaro. Thanks for the comment and support.
If I may add to those books… ‘Film Lighting’ by Kris Malkiewicz, my new Bible and the best technical resource I have ever come across. The ‘Cinematographer Style’ interviews by Jon Fauer, real conversations with great DPs. ‘Cinematography’ by Blain Brown, a fabulous overview of the theory and practice of cinematography. There are more wonderful books out there. All the above should get you going Duane!
Just got “Painting with Light”… so incredibly interesting! Love the part about lighting the ball and the cube, so simple, yet such a difference – Thanks Shane!
“Reflections: Twenty-One Cinematographers At Work” by Benjamin Bergery is my favorite, with lighting diagrams and in-depth analysis of staged scenes.
After using fixed lens video cameras for a number of years I totally forgot about using stockings. I have been trying to figure out how to cut the moire of my GH2 for a while now and I wonder if this may be the answer. Thanks Shane (my wife however, will not be happy).
Hi Julian. Thanks for the comment and support.
Any tips on how to get this to work on Canon DSLR lenses? Sticking it onto the rear like this would prevent the lens from attaching to the body..
What would the difference be putting the diffusion over the rear element vs putting on the front of the lens? And why would it be any different?
Great article btw. Love it.
Thanks for the kind words and support Evan. Putting diffusion over the front and rear element of a lens yields different results. I feel that netting the front is a little heavy handed and has a very 80’s glamour photo look to it. I like the more subtle look of netting the rear element.
I came back to this post a re-read it for the 3rd or 4th time…as I do with most of your posts. I’m shooting mostly interviews, the potential for such a great lighting effect seems limitless, and now I just can’t think of a reason NOT to diffuse my camera with a stocking. Have you ever used this technique or discussed its use in a non-narrative format? what’s the draw back to working with a camera after it’s been stocked? can you run and gun with it or does the stocking and tape setup require a little more tlc?
Hi Shannon, thats a cool idea you just have to be careful with diffusion as its hard to get sharpness back in post. It all depends on the project and the look you’re going for.
Hey Shane,
How does this technique compare to a Pro-Mist filter and which would be a better option?
Hi Evan.Take a look at our new post using pro mist filters to compare. https://www.filmmakersacademy.com/film-education-online-diffusion-for-the-digital-age-part-2/. The net is definitely a unique look that I would use for more of a period piece.
Thanks for another informative and inspiring post. Last November I shot some tests on a D550 using a similar technique but with the fabric stretched over the front of the lens – didn’t have the nerve to use it on the rear element.
http://youtu.be/JnGZNYJMLqQ
Thanks for the comment and support Kevin
You can diffuse either in front of the lens or behind it.
One very old trick I’ve used for years is to make the acquaintance of the local fabric store. There is a type of netting called TULLE that is commonly used for things like bridal veils. It comes in an amazing variety of closeness of the mesh, AND in the various tints. It comes in WHITE, ivory, bone … (there’s no such thing as simply “white”! These are brides we’re talking about…) not to mention tints in red, pink, blue, and amber. By shopping (and TESTING!) you can add a subtle spin of color as you diffuse.
Be sure to take a look at the pattern of the tulle mesh. There are squares, hexagons … And if you get specular light sources in your frame (think headlights on cars, streetlights, an actor’s cigarette lighter) you’re likely to find the tulle is giving you a free star filter effect, too!
Shane, there’s a terrible temptation to gnash my teeth at you (in the most friendly way possible…). I’ve been on your site for a long time this afternoon, and there’s so much useful information, it’s likely I’ll be here for some while yet. So much for mowing the lawn today! Many, many thanks!
Rick, I am so sorry it has taken me so long to reply. The Boeing commercial has been all encompassing. Those are great tricks and thank you for sharing. I am glad you didn’t mow your lawn months ago and sat down to read. Thanks again for your kind words and your support.
afterthought: While you’re at the fabric store (or you might wander over to a nearby dollar store) you should learn what embroidery hoops do. Often made of springy bamboo but now sometimes plastic, they’re two hoops that fit closely, one inside the other. Available in sizes from a couple of inches to a foot or more in diameter. Small ones will likely run you a buck or two.
Those into needlework use them for holding small areas of fabric nice and tight so they can be worked on. It ain’t rocket science to deduce that they’ll also do a great job holding your tulle or other netting stretched nice and evenly in front of the lens. If you’re really clever, you may find a size that covers the front element of your lens AND wedges nicely in the circular back (often inhabited by your POLA filter) of your matte box.
My next trick is to buy thousands of them, engrave Professional Motion Picture Net Holder on them, and charge $38.95 each …
Rick. Thanks the great info and suggestions.
Is there another brand of stockings that you have found is good? Preferably something that can be purchased online? I can’t find Fogal stockings anywhere.
Patrick. You can find the Noblesse 110 net here
Is there a cheaper option for a student-type to start experimenting with? Is it even worth trying with something cheaper?
Hi Shane,
Is blue-tac a good option to keep the nets stretched?
Amith, yes I think if you cut those disc’s down into small strips that work around the edge of the lens. This is what you are talking about, right http://www.ebay.com/itm/2-x-Bostik-Blu-Tack-Sticki-Tape-Circles-Discs-120-per-pack-/280901071369?_trksid=p3284.m263&_trkparms=algo%3DSIC%26its%3DI%26itu%3DUCI%252BIA%252BUA%252BIEW%252BFICS%252BUFI%26otn%3D21%26pmod%3D280901072506%26ps%3D54
A quick tip: should you get snot tape on the lens rear element, use a piece of masking tape to remove it. Sounds crazy but it works like a charm. Any residue left from the tape (usually none) is easy to clean off compared to double sided tape. Try it on a piece of glass first i.e. a window pane or filter. Rub the masking tape down with your finger if need be (avoid touching the lens of course) and peel off.
Repeat if necessary.
Wow. Shane you rule. This is the best resource for cinematography on the net and you are one the best DPs in the business. Thanks so much for giving back!
Mark Pommett, thank you so much for those wonderful words, much appreciated. Giving is back is what I do, never had a map given to me when I was cutting my teeth so I think this is absolutely essential to fuel this revolution.
Mark Pommett, WOW, thank you so much, those are wonderful words and keep me going. Thanks for sharing
It’s a real pleasure gaining insights into the art of painting with light;thanks guys! Shane; you are such a +
Simon, you are so welcome. You have to thank my wife Lydia for this. She created the Blog and the engine behind it. It was here forward thinking. Yeah to Lydia. Thanks for your kind words.
We always used to use black stockings for low key scenes or white for a brighter scene as it doesn’t lose you as many stops.
Also with Vaseline on the lens, it’s a no-no, always apply it to a clear filter. That way you can take the filter off when you’ve finished with the effect and your lens isn’t ruined. White spirit is about the only way to remove the Vaseline afterwards.
Colin Ashby, thank you so much for sharing, right on all accounts
Shane,
Thank you for the great post. Would you use this diffusion on 5d? Or only with cameras that deliver more resolution and have better codec?
Edward Smyla, I don’t think the 5D has the resolution. I agree. More robust codex something that needs the softening. The 5D does it already with its compression.
Very interesting Shane. Thanks for sharing your knowledge!
Erick Aguilar. Thanks for the comment and support.
Hi Shane, I’m currently prepping a series of commercials that include people time traveling back to various times (French Revolution, ancient Rome, etc…) and I’m looking to use a net for the first time. I’ll be shooting 2.8k Arriraw on the Alexa and there is pretty extensive blue screen work, which worries me. My VFX supervisor told me to not worry about giving them a “clean” image, that I can use diffusion, smoke, etc… Most VFX guys always want as clean an image as possible when I’m shooting blue or green screen, and while I would love to get the image close to the final product in camera, its definitely going against what almost every other VFX team I’ve every worked with has requested! What’s your opinion – do you think I’ll get the necessary edge separation with a back net?
Alex Disenhof, yes. Go for it. In camera is the way to go and I think you VFX’s team is right on. The more you can do organically the better the seamless effect of the CGI. On Terminator we had a good amount of Blue screen work. I was always smoking up, blowing up stuff, integrating tons of organic elements to make it feel more seamless.
Thanks for your informative post! What’s the best way to clean the ATG tape off the lens when all the magic is over?
Amanda, Pancro spray and Kem wipes is what we use.
Great article! Made me want to try this out myself. Always loved the look, but was a bit worried on how it work with a EF or E-mount lenses as they don’t quite sit the same way.
In case anybody else was wondering like me, you can take a look below on how it worked out for me on the 5D3 and my sony fs700 using photo lenses.
http://www.llirik.com/2014/02/organic-diffusion-on-5d3-fs700/
Kirill, thank you so much for sharing, and thank you for the wonderful words. you ROCK!!!!
Why not use the netting across an empty filter frame, rather than the rear element of a lens? Is there a difference in the effect given, using the netting in front or behind the lens?
Kyle Klebe, I used to do that on music vids in the 80’s, it is very heavy effect and no very subtle. I would not advise.
Kyle Klebe, yes behind the lens is preferable. Out in front really softens the hell out of the image. I used to do this on music videos in the 80’s. HA HA
I’m curious what the specific application process is for this. It’s a little vague as it’s explained, especially considering there are older AI-S lenses where the glass of the rear element moves inside the body of the lens when adjusting focus.
So is the idea to fix the stocking where it will stay put (on the area near the sensor), or on the glass itself (where it can move toward and away from the sensor when focusing)?
Sorry if this is confusing. If it is, it’s because I myself am a bit confused. :)
Mike, you need to be able to mount it to the ring around the rear element, mounting it to the glass without having an outer ring will be impossible to not effect your image so that is why it is difficult to net lenses that have elements that slide within the barrel. Hope this helps
Thanks so much for this! It was so helpful! I’m shooting a short next week and will be using this technique, I’ve been dying to for years and finally have the right script for it!
Great to hear that this post has been so useful for you Dino.
Great document. Than you Shane.