Cinematography: Camera Etiquette and Workflow
After completing the Navy SEAL movie Act of Valor, my team and I created a workflow and camera etiquette that increased our speed exponentially. I’d like to share some of these pointers with you so that you can also streamline your future productions.
Camera Etiquette and Workflow
1. Labeling the cameras internally is paramount.
When you are shooting multiple cameras in different conditions you need to know which camera is which. To begin this labeling system, shoot a still, take that card from the camera, and then download it to your computer. Next, access the file and rename the jpeg 999. Remove the card from the card reader, load it back into the camera and take another still.
Now the next movie still will be labeled the 1000 series. This will be A camera. B camera will be 2000 and so on. This process is important because if a CF card label falls off mid-shoot, you will always know which camera it came from. This labeling process is also essential for identifying and troubleshooting cameras with dead pixels.
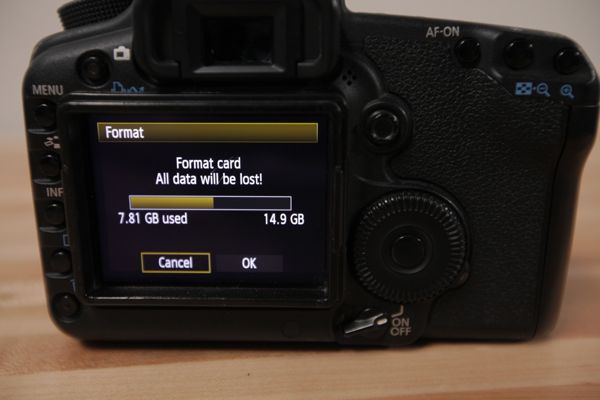
2. Always format your cards before recording on them.
This will implement your internal labeling system as well as ensure that the editor does not receive excess footage from previous shoots or already downloaded media from your production.
3. Labeling your cameras externally.
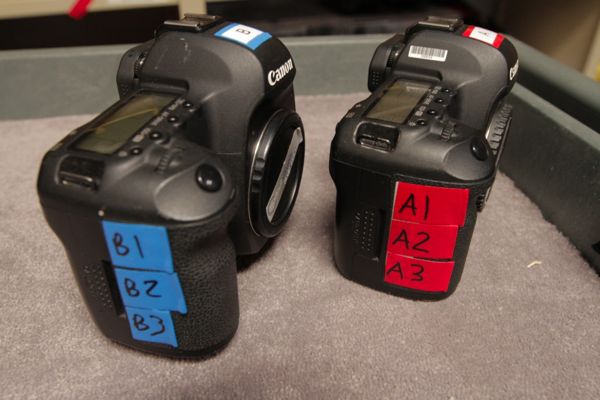
It is essential to label your cameras externally in order to maintain an organized camera package. I label the camera on the top near the hot shoe.
4. Label your cards with external labels for quick access.
Labeling your cards and having labels placed on the side of your camera for quick and easy access will help speed up your process. During prep, label your camera hand grip with pieces of electrical tape that read, A1, A2, A3 for example. That way, when the card is full, you can take it out, slap the label on and hand it off to your media manager, or place the card into a CF pelican case for storage.
5. Having your ND set by your side.
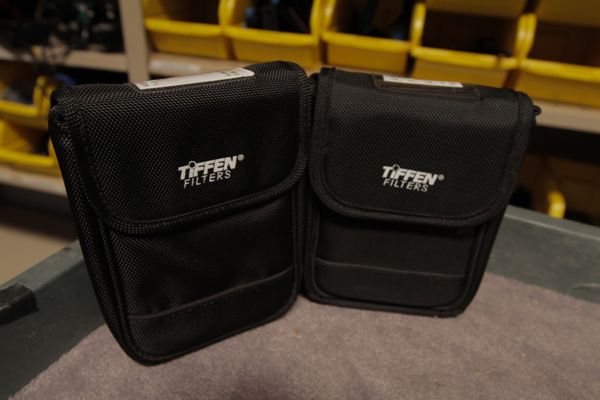
I personally designed the Tiffen 77mm and 4 x 5 WW ND filters with a pouch so they fit on your belt. This makes your filter change fast. I like to keep my f-stop between a 2.8 and a 4. This gives me a wonderful shallow depth of field.
6. Different size lens diameters.
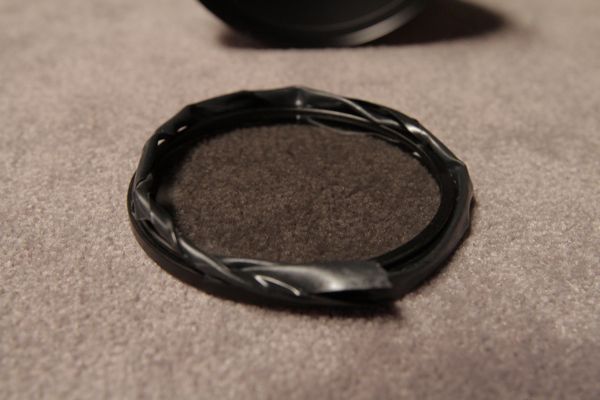
If you have different size lens diameters, electrical tape will slam that 77mm on any still lens you may have in your quiver.
7. Filtering Zeiss CP2s.
This little trick kicks butt. For all of you that don’t have 4×5 matte boxes but want to use your 77mm filtration, just take a piece of electrical tape and roll it up so that it is sticky all the way around. Now wrap that around your filter ring and stick it to the front element of the CP2.
The element on all of the primes is the perfect size to accept the 77mm stick-on application. I fly without a matte box a lot to increase speed. The non-flaring coating on all Canon and Zeiss glass is pretty exceptional when it comes to contending with the sun.
8. Tape filters onto the front element (RARE)
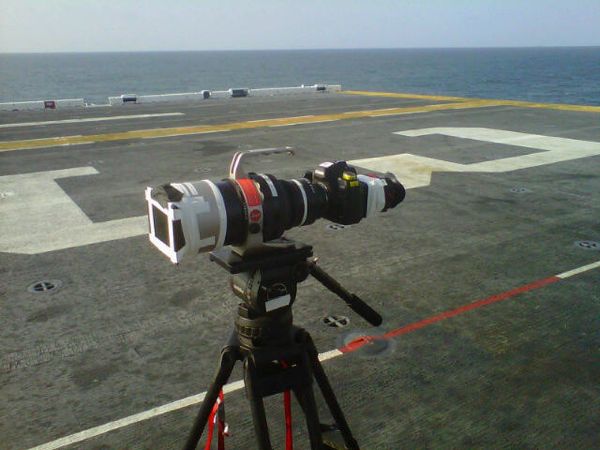
If you don’t have drop-in filters for long lenses, I physically take 4×5 filters and tape them onto the front element. This will slow down the lens’ ability to intake light, so try and minimize the use of this technique.
9. Build your configurations and keep them at the ready.
Converting your rig takes time. Try and anticipate what configurations you may be using that day. On Sports Authority, I had every rig built with a camera in place. We were able to simply grab the configurations and shoot. If you do not have a large number of cameras, try to at least build the rigs that your camera can easily snap into.
10. A camera cart is essential to maintaining organization.
The camera cart will keep you mobile and provide a place to build and store your configurations. I went out and bought those Rubbermaid carts that cleaning service people use. Put carpet on the top and then screwed plywood to the bottom and attached some cheap Harbor Freight wheels to it.
On your Cart
You should have Allen Keys (Metric & Standard) and Lens Cleaning (Kimwipes and Lens Cleaner). Think of your cart as an extension of your pouch.
11. Extra batteries always in your pocket.
Always a fresh batt at the ready will help you maintain a fast tempo.
12. Extra cards in a 940 Pelican case.
A 940 Pelican case with extra cards in your pocket will give you a safe place to hold and store exposed cards. Treat this process like handling film. Your fresh card is an unexposed negative. The card that you just pulled out is exposed negative.
13. Use High-Quality Cards.
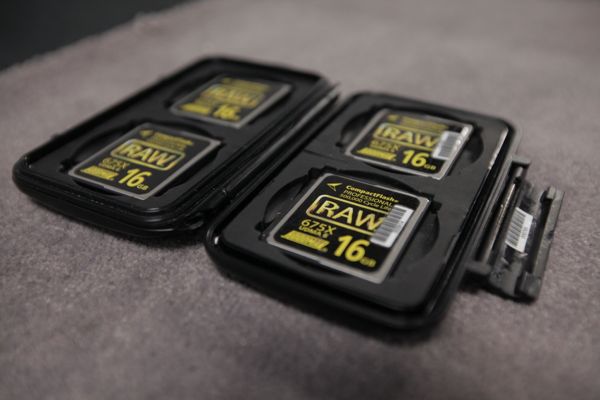
Using Hoodman RAW cards are incredibly reliable and make for 3 times as fast downloading. This keeps your speed and accuracy at a higher level. Your Media manager can be viewing the media sooner and give feedback on footage, quickly highlight any problems that they might find with your cameras, exposures, focus, you name it, mine has my back.
14. Keep INFO. BAR visible on the bottom of your screen.
Keep your INFO. BAR up on the bottom of your screen so that you are always double-checking yourself. Make sure you have the desired ISO and shutter speed. There have been many times where I’ve found that the little menu wheel gets bumped and the shutter speed has accidentally shifted away from the 1/50th.
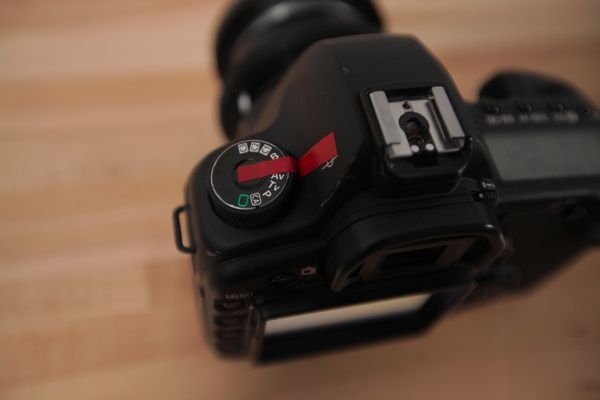
Tape this wheel off for safety and the wheel that switches the camera from manual to auto. Canon issued a lock update a while back, if you send your camera in they will put a lock on the top wheel where you have to push down to be able to move it.
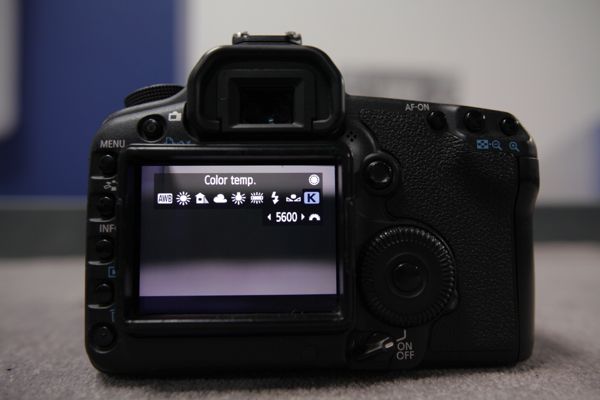
15. Always check your WB on the top of your camera.
Always check your WB on the top of your camera to make sure you are exactly where you want to be and that all your cameras are in sync.
16. Lens cleaner and tissues on your belt speed up your efficiency.
I am constantly dealing with dust and dirt blasting the lenses and filters. Having these items nearby will save you many trips back to your camera cart.
Your toolset should include these items…
In Your AKS (All Kinds of Shit) Bag:
Leatherman, Flashlight, Scissors, Sharpies (Include a Twin Tip Sharpie), Grease Pencil, Velcro, Black Paper Tape, Allen Wrench Set, Screwdriver (multiset is best), Jewelers Screwdriver (multi), Slate Pen (w/ Eraser), Chalk In Holder, Knife, Ball Point Pen. Lens Cleaner and Wipes…
On Your Belt:
Air Can, Small tape roll: 2” Photo Black, 1” White Gaffers Tape, 1 Colored Electrical Tape. Also, when you go out on shoots, it is important to own a surveillance walkie-talkie headset as well.
FINALLY
Never trust the exposure bar or histogram. Those take exposure based on a RAW and or Jpeg still frame, not how your video should be exposed. If you go by the histogram you will continue to deliver footage that is overexposed and looks like video, not digital film. Use your eye or an HP Dreamcolor lighting monitor.
If there is any secret sauce that I have developed, it is my picture style. Personally, I never listen to the camera when it comes to exposing my image.
What does your etiquette look like? What makes you fast and efficient?
Schedule 1-on-1 Video Call with Shane Hurlbut, ASC
Looking for mentorship in the film industry? Schedule a 1-on-1 meeting with Shane Hurlbut, ASC today! This is where you can get expert advice from an industry professional on your career or a particular project.
About Filmmakers Academy Cinematographer Mentor Shane Hurlbut, ASC
Director of photography Shane Hurlbut, ASC works at the forefront of cinema. He’s a storyteller, innovator, and discerning collaborator, who brings more than three decades of experience to his art. He is a member of the American Society of Cinematographers, the International Cinematographers Guild/Local 600, and The Academy of Motion Picture Arts and Sciences.
Hurlbut frequently joins forces with great directors: McG’s Netflix Rim of the World and The Babysitter, plus Warner Bros. We Are Marshall and Terminator: Salvation; Scott Waugh’s Need for Speed and Act of Valor; and Gabriele Muccino’s There Is No Place Like Home and Fathers and Daughters. His additional film credits include Semi-Pro; The Greatest Game Ever Played; Into the Blue; Mr 3000; Drumline; 11:14, which earned Hurlbut a DVDX nomination; and The Skulls. Notably, his television credits include the first season of AMC’s Into the Badlands.








Wow, interesting thoughts on the histogram… I definitely rely on it quite a bit, though I’ve generally been fairly happy with my exposures. The problem with using my eye with the DSLRs is the inconsistent lighting scenarios and differences in LCD brightness that change my perception of the image in camera… any thoughts on how to “see” the image consistently indoor and out? Just a matter of getting a DP6 or Z-finder?
James, z-finder helps but I exposed all of Act of Valor without a Z finder, with all the light contamination hitting the screen. The back LCD is the best rendition of color and contrast in this Canon color space.
Finally someone explain what you need to know so you don’t have to reinvent the wheel. Real kick ass tips: so many hours saved because of you.
Thank you for taking the time to write this post.
Thank you!
logicalnot, thank you so much for your kind words and support. You are so welcome.
Thanks Shane for this detailed roundup of your workflow.
Most of it seem really simple but when it comes to working effective then those little “secrets” will help a lot.
I’d like to know if you’re using the Technicolor cinestyle on your DSLRs or if you’re still using your neutral setup that you mentioned in some BTS videos on vimeo and here on your blog.
Sebastian Kubatz, you are very welcome, yes KISS, keep it simple stupid is our mantra. Yes still using my picture styles not technicolor’s.
I’m shooting on a 60D and for fun at a friends wedding (a week long event) I did a shakedown to see just how fast I work it if I had to in a real guerilla situation — no permits, no time etc. I was on my own without any assistants. Not worrying about delivering something allowed me to try stuff and if it didn’t work there was no loss. This was much more an amateur set up, but sometimes, you just need to get the shot and get out…
1 – Variable ND filter. You just can’t shoot without ND’s. This was on and off the lens all the time. You do get some nasty flares occasionally, but the light rage I was shooting in was all over the place and I didn’t have space for multiple ND’s. Not to mention, the variable ND is FAST. I generally shot at f2.8-5.6 indoors and out. My sub optimal but super fast solution was to lock in at 1/50 f2.8 and check for exposure at the lowest ISO I could by eye on the screen. If it was still over, put on the Variable ND. It was weird, because it’s sort of the exact opposite to what I’d do for stills – here I was controlling exposure by adjusting the ISO first, f-stop second and shutter speed.
On some shots I got lazy and kept the ND on and racked up the ISO – even only to 800 sometimes. I’m sure it goes without saying: don’t do this. The seconds it buys you aren’t’ worth it, you just can’t judge the noise from the screen. When I got back all that footage looked horribly noisy, for no reason other than my own laziness. As soon as you don’t need it, take the ND filter off.
2 – Record, Copy, Format. I had a stack of 16Gb cards. Like Shane, I now think I probably prefer the 8Gb, Dont’ go for 32Gb it card slows you down even more because copying off the card. Not to mention the heating issue. I only had one camera, so I marked them a b c d etc… As soon as they were full, I took time out and dumped to the laptop. I had a Samsung netbook with built in SD card reader which was fine, but I’m switching to a MacBook Air with built in SD reader which fits my photo bag better. You quickly forget which card you’ve copied and which you haven’t so it was ESSENTIAL to format the cards the second they’d finished copying the files.
3 – Monopod rig. I have a small telescopic monopod that I can attach to my belt. (I think I read about Gale Tattersall doing this on House and stole the idea from him). You can get just enough stability and it will go in your pocket. if you’re on a wider lens (I was shooting at 28mm) it’s fine for a handheld look. It’s no good on a 50mm. On the APS-C size sensor it’s way too telephoto and gives you nasty rolling shutter.
3 – Microfibre cloth. Your ND filters will get fingermarks eventually. The screen will get fingermarks in seconds. Keeping this to hand is essential.
4 – Loupe (I use an LCDVF). The 60D screen is very nice and I actually got used to focusing by eye using the small screen. I also started using the loupe less because the one time someone stopped me from filming I had the LCDVF on and the museum guard started asking questions. Still, if you can, a Loupe is better than just eyeballing.
5 – ND Pouch. I have a little pouch, a little shorter than an iPhone, but a little thicker that held my ND filter, 5 SD cards and a microfibre cloth. Fits inside my regular jacket pocket easily.
6 – Don’t take too many lenses. I started with 2 (50, 28) and rapidly moved to 1: my 28mm. I used my feet not my zoom. Sure, I couldn’t get some shots I wanted, but I think things look better for it. I had to be more inventive. I actually really got into the 28mm look on the APS-C. Not quite standard, but not quite wide angle. I personally love the 2.35 aspect ratio, and I find the 28mm works well for people in that ratio.
Wow man. You do good, and that’s all I have to say.
Brendan, thanks for the support.
David Thomson, thank you so much for sharing. ROCK ON!!!!
Thanks! I’ve got lots of great ideas and techniques from your blog over the past year or so! Nice to be able to contribute back! I hope it’s useful! to people…
Here’s that monopd thing. It’s only $10…
http://www.amazon.com/VidPro-MP-10-Vidpro-Monopod/dp/B001GZI4LA/ref=sr_1_2?ie=UTF8&qid=1315784642&sr=8-2
You can put it in your back pocket or inside a suit jacket. It’s really that small. That’s why I love these DSLR’s, you can just take them anywhere and get such amazing results. I just wish the rolling shutter was gone…
David Thomson, thank you so much for your insight. Much appreciated
Shane – you’re right, I still find that the LCD is the very best exposure indicator there is. Sadly it means that I’m not training myself to light by eye but to light to the LCD. I would still be quite lost with a light meter. Perhaps I should forget this and acknowledge the future of cinematography is WYSIWYG. At any rate, that exposure bar is an evil little guilt tripping thing, making you think that everything should be the same level of brightness. Ignore that and you’re on your way to creating images which have a feel to them.
Oli Kember, you are so right. LCD baby all the way.
Wow this Camera Etiquette and Workflow sings right into the reason I’m so excited to work and rock it out with the team. Everyday and every setup is a learning situation how to make it work and how to go with speed. Even if we have done the setup before, we always make it better. One of my favorite make it work and go with speed is the long lens with the 4×5 filter electrical taped on. Great to read some of the Camera Etiquette and workflow thanks for sharing.
Marc Margulies, I thought you would like that picture. That was an awesome tape job on that aircraft carrier Marc. Thanks for the support my good friend and co-collaborator.
Another tip I’ve adopted after working with you is to have RRS quick release L-plates on all my cameras & quick release plates on all my long lenses with the lever release clamps on all my tripods, rigs & mounts. This makes everything universal and changing your setup a snap. Also having the Z-finder mounting bracket glued to the LCD on every camera is a cool idea.
I only have 2 cams and I’ve adopted a RRS QR system, as well. It makes moving the Viewfactor caged cams from a light handheld rig to a fully decked out sticks set-up in just a few seconds.
Matt Short, Hey my friend, thanks so much for the support and great blog. Loved the read and amazing shots. WOW!!!!!
Thanks! Glad you liked them. That was a fun gig.
Thanks for the great post as always, Shane.
You mentioned again about using your HP Dreamcolor to light with. I’ve seen you using it on a lot of your projects. Do you have any experience lighting with the Dell UltraSharp U3011? If so, what’s your thought on it?
Shawn McHugh, you are very welcome, no I haven’s used the Dell. If you are loving what you get from it then it works for you. I gravitated towards the Dreamcolor because it is a industry standard color correction monitor.
Love your articles Shane!
Should the new Sony OLED Monitors be used as a replacement for the HP DreamColor monitors on set and in the Edit Suite due to the better black levels?
I notice some people complain about flicker with 24p material on these OLED monitors.
Have you any experience (or opinions) using either the 7″ Sony PVM 740 or 17″ PVM 1741. I’d love to hear your thoughts…
Many thanks.
Nick D, I haven’t played with them. I have to say that there aren’t many monitors that rival the HP dreamcolors. It is the best that I have found.
Hey Shane, great post, I had forgotten about tip#1 for setting the clip names, thanks.
Regarding the Dreamcolor, mine just died after 15 months of use, 3 months out of warranty. Amazingly, HP had no repair information to give me, essentially suggesting that it is a not meant to be serviced and that my monitor is a brick. That’s a lot of money for a “disposal” item. I’m working now on getting the credit card extended warranty honored so I can get a replacement, but I thought this was worth mentioning. Wondering if you have had any of yours go down and if so have had any more luck getting them serviced.
Charles Papert, Hey Pap, bring it by and we will get it serviced no problem my friend.
Sweet! Thanks, Shane. As always, your posts are informative and useful in the real world.
Cheers,
Eric
Eric Diosay, great to hear from you my friend. I hope you are feeling better and thank you for all of your support across the board.
Thanks Shane for sharing!
Do you generally expose to the highlights?
-How many stops do you allow to overexpose when the sun is hitting a persons face?
-And in another scenario, how many do you allow to underexpose on the person’s face at night under the moonlight?
Thanks a lot!
Alex,Do you generally expose to the highlights? It depends upon the set up. I go with what the story tells me. If I need to see out a window I will balance the light inside and out, if it doesn’t I blow that mother f&^% out!!
-How many stops do you allow to overexpose when the sun is hitting a persons face? 2 stops
-And in another scenario, how many do you allow to underexpose on the person’s face at night under the moonlight? 4-5 stops
Thanks, thanks, thanks a ton!!!
Yes, I try to expose to the highlights. I’m a bit worrying when something burns, unless I put Pro Mist to have a nice glow to a burn.
Here is little clip I’ve done with CineStyle, Black Pro MIst 1/4, I liked how the CineStyle coped with the high contrast.
http://www.youtube.com/watch?v=JcF3q6zX_48&feature=player_embedded
Alex, great work. That looked amazing. Thank you so much for sharing. The Cinestyle looks great. It feels very well balanced.
Shane,
I carry my CF cards in a metal case made for storing credit cards. The compact little item will hold 4 cards in their plastic cases, perfectly. And the case is only ten bucks. You can find them at most stores (Office Depot, Bed Bath & Beyond) that have a “As Seen on TV” section.
Jim Long, sweet, I will check them out. Thanks for the tips
Thanks for all what you do! Your blogs are EPIC! Thank YOU
Great as usual.
Tell me: what differentiates a “video” look from a “digital film” look, can you be more specific on what the differences would be?
… I thought that was an interesting nugget, but am finding myself unable to wrap my brain fully around that statement.
Duane, video looks like video, sharp, clean, crisp, little compression and tons of Depth of field. The art of digital film is large amounts of compression, because this is your organic film grain, shallow depth of field, softer tones and a less sharp image.
Hi Shane
It’s so inspiring to follow your constant commitment to the dslr community. It obvious to us all, that you are a very busy man – and still you always take time to share your huge experience and knowledge with us all.
I have learnt a lot from you and just wanted to let you know that it’s greatly appreciated:-)
P.S. I love the electric tape trick 4 CP2!
Wholelottalove,
Thomas Roger
Thomas Roger, first off I cannot thank you enough for your support. These kind words fuel us at Hurlbut Visuals to continue to bring you the best content that is not about gear, but the story, the lighting and the best way to achieve these.
On behalf of all my friends and I here in the film program at the University of Central Florida, I have to say thank you for everything you have contributed to the DSLR filmmaking community.
Our school tends to focus on film theory and history. We frequently have to go to outside sources to learn all the technical details needed to complete our DSLR shorts. I have found your site to be more than enough to fill that technology gap.
It is inspiring to see how you continue to push the boundaries of DSLR technology and revolutionize the art of filmmaking. You have proven that there really are few limits as to what you can accomplish on a small budget these days.
The information on your site has helped me grow as a student filmmaker and has made a huge impact on how I work on set. It continues to be an invaluable source of information and inspiration. Keep up the great work!
Sincerely,
Cornelius O’Donoghue
Cornelius O’Donoghue, these wonderful comments are what fuel me, inspire me to continue to push the limits and challenge this platform to be better, faster, cleaner, etc. I am glad that I have been able to help your creativity grow and educate you on a tool that brings incredible stories to life in such a unique way.
Great post Shane, really useful stuff! ( love the AKS bag info! )
I am a bit torn on Picture Profile at the moment for 5D, used to be using a custom neutral one in camera – but switched to technicolor recently. Was wondering if you could explain what settings / PP you are using and why you chose that over technicolor ?
Cheers
seb
Sebastian,
Shane has his own pic style. It is awesome.
I decided to play around too and make my own pic style. The Canon Mark 5d ii sensor is powerful. Shane has figured it out. I’m starting to get it.
Here’s a shot I did of my neighbor,
I use my exposure meter as a gauge (like a “gas gauge on a car” not as it is supposed to be used and the histogram – for info limits, and my old eyes). I did use only one very cheap $3, 40 watt clearance bulb.
PS. You may want to look thru Shane’s old posts as there may be some info there?
Sebastian_TR, It is more a personal preference. I love Neutral, and how the 5D responds in this picture profile. SO I took that and stretched it, expanded the color space to give me about 2 more stops of latitude. Technicolor uses a small portion of the Canon color space, which is only 8BIT, where my picture styles use the full range.
Thank you Shane for finding the time to share so much with the community. Thoroughly enjoyed this post and many others. The histogram tip is priceless, got burnt a couple of times by relying solely on it. I use a Marshall LCD70XP to eyeball exposure, find the false color function to be a helpful reference but not entirely accurate though.
Thanks again for everything, keep on rockin’
Salvador Garza, you are very welcome. It is funny, some one showed me the false color function the other day. I exposed the image and looked at it in false color, that would have boned me huge if I had used it. Trust your eye and get away from all the scopes. PLEASE!!!!
I never trust the cameras internal meter, I’ve been relaying that to others for awhile. I’m glad to hear you say it too.
Bud Dickman, Yes, and Canon’s internal light meter sucks to begin with. You have to go with your eye, train it, hone that skill because it will be your best asset. Stop the tech. Go with your gut and your instincts.
Talking about speed – one thing I really miss from my earlier DSLR experience was being able to quick release the camera body to different config’s a lot like how you guys are doing it.
I’ve since switched over to the Viewfactor cage and I miss that ability to strip the camera down really fast. It looks like you guys are using the Really Right Stuff clamps/plates (w/ single 1/4 20″ bolt- ???) to accomplish the quick changes. What model plate(s) specifically are you using from them? How are you finding having the whole weight of the rig on one single bolt? Any twisting? If it’s not a single bolt version clamp, what 15mm block are you using to get the hole alignment just right on the Contineo?
Keep up the great work here! Really inspiring!
Barry Cheong, the baseplate is an HV baseplate, one that you cannot buy. The RRS quick release and clamp you can buy online. We mount a 6″ rail on the bottom of our setup. I will keep on trail blazing. Thanks for the support.
Shane,
Great post. I love the tip about taping the 77mm NDs to the larger lenses because working without a mattebox is a dream come true. I just have one question: do the Tiffen HV filters you mentioned also help cut the IR that the DSLR sensor picks up?
Thanks for all you do,
john
John, Hi John, Thank you so much for your kind words. The Canon 5D has a built in IR Filter on its sensor so IR filtration is not needed.You are very welcome.
I thought I’d pass along my method of making a Zacuto Z-finder with a base plate + mounting frame play nice with a RRS quick release system. This will allow you to move between platforms in seconds (e.g. tripod, slider, shoulder rig) and use the z-finder when needed. In changing platforms there is nothing to attach or reattach except snapping the z-finder on and off.
I have always used RRS L-plates on my still cameras. The problem is the L-plates don’t work if you want to use the z-finder with a base plate held frame (Zacuto’s newer system.) You need the camera, the Zacuto base plate (gorilla or dslr) and a RRS plate on the very bottom.
The solution is to use a RRS rail instead of an L-plate. The rail lives beneath the Zacuto base plate and it allows for quick attaching to any RRS clamp.
I’ve got a blog post here: which goes over it. All that is needed is a small RRS 73mm rail. The rail comes with an adjustable flange which can act as an anti-twist block. It works beneath either of the Zacuto base plates (gorilla or dslr.)
I’m also a convert to those Tiffen pouches. I bought three this summer, one for each set/size of the ND filters I own. The pouch has a window on top, so it can be labeled with the filter size. B&H sells the pouches for $18 ea.:
http://www.bhphotovideo.com/c/product/735394-REG/Tiffen_4BLTPCHLGK_Belt_Filter_Pouch_Large.html
Jon Roemer, thank you so much for all of your input. Love your passion and I love those pouches.
I apologize in advance for what may be a noob question . . .
Is it heresy to use a variable ND filter versus a set? If so, why?
dubba, variable ND’s are two polarizing filters. When you rotate them against each other you create Neutral Density but at a cost. The cost is skin tones and vitality. The polarizers job is to reduce reflections. Your skin reflects a ton of light so by using a Variable ND you are dialing the life out of a person’s skin, life out of a particular landscape, life out of creativity.
Shane,
I had recently purchased my 5d and a few days later I was cast into a position of camera work on a docu that my buddy is producing. I had a 4 and 8 gig CF card, as bare essentials with a monopod. Luckly, I had just downloaded the Cinestyle picture profile. Where I we failed with the workflow was the lack of CF cards, and the fact that the other 2 cameras we were using were an AF100 and a GH2. (lesson learned big time) But where we were victorious was me using the lessons you had taught with treating digital as reversal, and using Cinestyle to get extra wiggle room. (we rocked it with that) And given some of our situations we were shooting in areas I couldn’t use our lighting packages since a massive flood had knocked out all power and we were using available light. Thank you so much for being a great referance and teacher.
Donald Hankins, great story and wonderful input. Thank you so much for your wonderful words and support.
Simple card organization – When shooting by myself I don’t have someone downloading cards. I used a red sharpie and put a big red “X” on the backs of all my cards (labels on front). When a card comes out of the camera, it goes in the Pelican case with the red “X” facing up. Simple and easy. If it’s blank and available, the label is facing up instead.
Peter Hastings, thank you so much for your input. That is a great idea.
Thanks for the excellent post, especially re labeling cameras. I cannot tell you how many shoots I know of that wind in post production hell, because of lack of planning this.
Pre-production and organization are the keys to a smooth shoot and efficient post production.
Hi Shane, thanks for the awesome advice. Something that I would love to see is the same pelican card case in a brighter container. I haven’t been able to find anything waterproof that is. It scares me to think of the most important thing on a shoot sitting in a jet black container. Excited to see Act of Valor!
Hi Shane, you have done us all a great service by unselfishly posting this incredibly helpful information. Who says we can’t all succeed? I do have a couple questions for you:
-When you talk about lighting with the DreamColor Monitor, what do you mean? Do you tether to it?
-Regarding ND filters, do you see any loss of sharpness or color cast when you use them? I have tried the Tiffen brand and see a significant color shift.
Please let me know what you think if you have time. Once again, thanks for the excellent information and congrats on your great projects
Pk.Thanks for the kind words and support. When I talk about lighting with a dream color monitor it means that the image from the camera is running through a HP Dream Color Monitor. Its my eyes into the HDSLR color space and I use it to gauge exposure when lighting. The best ND filters are the Water White ND filters that I developed with Tiffen http://www.filmtools.com/tiffen-77mm-indie-neutral-density-kit-w77indndkt.html. They don’t muddy the colors and won’t affect the sharpness of the image.
Will the electrical tape trick work for Nikon Ai/Ais lenses?
Morgan, yeah baby